Two bags, two styles, one single trend. The Japanese knot takes over summer 2025 with two irresistible crochet...
Search in blog
Blog categories
Latest posts
-
 Two crochet bags: the Japanese knot tutorial that speaks the language of the Hadid sisters – summer 2025 editionRead more
 -
") Crochet under the sun: summer 2025 fashion to show off with your best friend (handmade hats included!)Read more
Crochet under the sun: summer 2025 fashion to show off with your best friend (handmade hats included!)Read moreTwo crochet hats perfect for summer: a bucket hat and a mesh hat — fresh, trendy, and easy to make with our free...
-
 The coolest clutch of summer 2025 — and you can make it in 2 must-have colors. Chiedi a ChatGPTRead more
Two irresistible colors, one project: the most wanted crochet clutch of summer 2025 is easy to make with the...
-
 Athens the crochet bucket bag to show off at the beachRead more
Last project of our Summer Crochet series! Athens is the crochet bucket bag inspired by the colors and elegance of...
-
 Paros the trivet fish a seaside-style decoration for your beach house and beyondRead more
Want to bring a touch of summer and seaside style into your kitchen? With our crochet tutorial, you can make Paros –...
Popular posts
-
 Crochet bags, the models for spring-summer.One of the most searched accessories on the web, patterns, tutorials, ideas, projects, accessories, here's how to...Read more
 -
 Crochet bags for spring summer 2024. 5 models of handmade sling bags.Discover the latest trends for Spring/Summer 2024 with our exclusive guide to 5 crochet sling bag models. Perfect for...Read more
 -
 The Crochet Net Bucket Bag: A Trendy Accessory for 2024Learn how to make a crochet net bucket bag with our simple and detailed tutorial. Use elastic cord, a size 5 crochet...Read more
 -
 Crochet rugs, a passion that is becoming a trend.In this article, dive into the art of crochet rugs and discover how to create unique and personalized pieces for your...Read more
 -
 From runways to street style: the trendiest crochet bags.Are you also passionate about handmade items and want to create your own capsule collection of crochet bags? Here are...Read more

Crocheted Christmas tree package toppers.
Welcome to our creative corner where the magic of Christmas intertwines with the joy of DIY.
Christmas is a special time of year, a moment when twinkling lights and Christmas carols fill the air with contagious happiness. It's time to slow down, to appreciate moments spent with loved ones and, why not, to dedicate yourself to handmade creations that make this period even more special.
In our blog, we firmly believe that there is something incredibly rewarding in creating with your own hands.
Each stitch, each knot, each small decoration born from our creativity carries not only the beauty of the created object but also the warmth and love of the person who made it. This is the true spirit of Christmas, a time of sharing, joy, and attention to others.
Today, we want to share with you a project that embodies all of this: the crocheted Christmas tree.
This little tree, worked with care and passion, can become not only a delightful decoration for your home but also a thoughtfully made and affectionate gift for someone special. The crocheted tree is a symbol of the slowness and attention to detail that we often lose in the frenzy of the holidays.
In the next few lines, we will guide you step by step through the process of creating this little masterpiece. Whether you are a crochet expert or an enthusiastic beginner, this project is a delightful way to bring a touch of warmth and personality to your holidays. Prepare your yarn, your crochet hook, and immerse yourself with us in the joyful and creative atmosphere of handmade Christmas!
WHAT YOU NEED:
You can choose the yarn based on your idea of Christmas, we have chosen green, but you can also make them with white or red, for example, or with jute, lycra, in short, you have really many ideas at your disposal.
Crochet hook, this time we have chosen an aluminum crochet hook from Tessiland®.
Procedure for realization:
We start our work with 15 chains, then go back and place the crochet hook not in the first but in the second chain, starting the work of 14 single crochets, then mount 1 chain and turn the work.
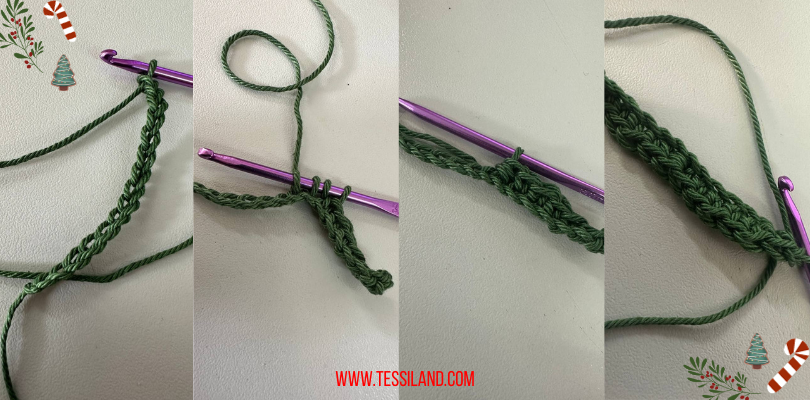
We work the next rounds only in the outer part of the stitch below.
We work 6sc, +1 decrease, + 6sc, +1ch and turn the work,
6sc, +1 decrease, + 5sc, +1ch and turn the work,
5sc, +1 decrease, + 5sc, +1ch and turn the work,
5sc, +1 decrease, + 4sc, +1ch and turn the work,
4sc, +1 decrease, + 4sc, +1ch and turn the work,
4sc, +1 decrease, + 3sc, +1ch and turn the work,
3sc, +1 decrease, + 3sc, +1ch and turn the work,
3sc, +1 decrease, + 2sc, +1ch and turn the work,
2sc, +1 decrease, + 2sc, +1ch and turn the work,
2sc, +1 decrease, + 1sc, +1ch and turn the work,
1sc, +1 decrease, + 1sc, +1ch and turn the work,
1sc, +1 decrease, +1ch and turn the work,
1 decrease, then work a single crochet around the edge for the entire perimeter of the tree.
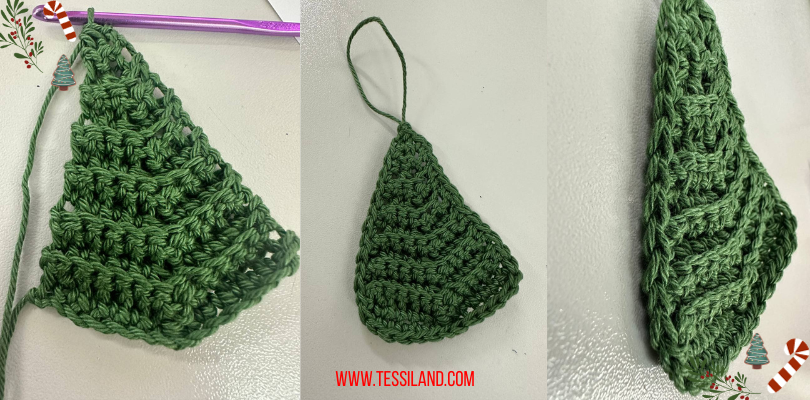
Et voilà, the little tree is finished and we can use it as decoration for our gift packages, as a place marker, as a hanger for the tree, or to give to people we care about.
You can also enrich the project with the application of beads or a lurex thread, bring out the creativity that can't be missing at Christmas.
Rosaria Tessiland®
.jpg)
