Two bags, two styles, one single trend. The Japanese knot takes over summer 2025 with two irresistible crochet...
0 prodotti 0
Your cart is empty
Search in blog
Blog categories
Latest posts
-
 Two crochet bags: the Japanese knot tutorial that speaks the language of the Hadid sisters – summer 2025 editionRead more
 -
 Crochet under the sun: summer 2025 fashion to show off with your best friend (handmade hats included!)27/07/2025Read more
Two crochet hats perfect for summer: a bucket hat and a mesh hat — fresh, trendy, and easy to make with our free...
-
 The coolest clutch of summer 2025 — and you can make it in 2 must-have colors. Chiedi a ChatGPT23/07/2025Read more
Two irresistible colors, one project: the most wanted crochet clutch of summer 2025 is easy to make with the...
-
 Athens the crochet bucket bag to show off at the beach20/07/2025Read more
Last project of our Summer Crochet series! Athens is the crochet bucket bag inspired by the colors and elegance of...
-
 Paros the trivet fish a seaside-style decoration for your beach house and beyond17/07/2025Read more
Want to bring a touch of summer and seaside style into your kitchen? With our crochet tutorial, you can make Paros –...
Popular posts
-
 Crochet bags, the models for spring-summer.29/04/2023One of the most searched accessories on the web, patterns, tutorials, ideas, projects, accessories, here's how to...Read more
 -
 Crochet bags for spring summer 2024. 5 models of handmade sling bags.05/04/2024Discover the latest trends for Spring/Summer 2024 with our exclusive guide to 5 crochet sling bag models. Perfect for...Read more
 -
 The Crochet Net Bucket Bag: A Trendy Accessory for 202401/06/2024Learn how to make a crochet net bucket bag with our simple and detailed tutorial. Use elastic cord, a size 5 crochet...Read more
 -
 Crochet rugs, a passion that is becoming a trend.21/01/2024In this article, dive into the art of crochet rugs and discover how to create unique and personalized pieces for your...Read more
 -
 From runways to street style: the trendiest crochet bags.06/09/2023Are you also passionate about handmade items and want to create your own capsule collection of crochet bags? Here are...Read more
Two crochet bags: the Japanese knot tutorial that speaks the language of the Hadid sisters – summer 2025 edition
There are sisters who share their wardrobe, others who steal each other's accessories. And then there are those who, despite having fashion in their DNA, speak two different languages of beauty and trend. And summer 2025 has something for all of them. It's with them in mind – sisters like Gigi and Bella Hadid, each charming in her own way – that this project was born: two bags, same model but opposite souls. Summer 2025 fashion is all about crochet, and here's the proof.
The star? The Japanese knot bag: elegant and clever in its simplicity, with two handles of different lengths – one shorter, one longer – to slide one into the other to create a refined knot. One version in navy blue, essential and metropolitan. The other, in gold cream with lurex, bright and sophisticated. The constructions? Totally different. One with a single panel, the other with two panels. One common thread: the 2025 crochet trend.
Whether you feel more like a golden girl or a dark romance, here you'll find the tutorials that speak your language. And the best part is, you can start right away.
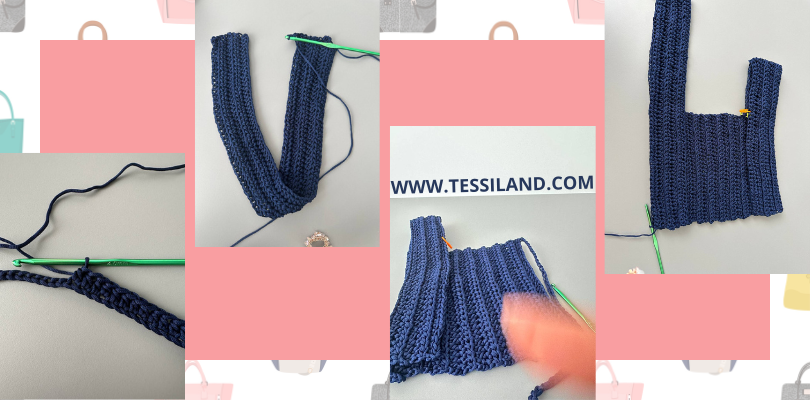
Model 1 - Japanese Knot with one panel (navy blue version)

Materials:
- 1 spool of Thai Sublime Navy Blue
- 3 mm crochet hook
- Yarn needle
- Scissors
You can find them here:
Instructions:
Handle 1
Chain 80 + 3.
Work 1 half double crochet into the fourth chain from the hook.
Continue with half double crochets to the end.
Work 1 single crochet into the last stitch, then chain 3 and turn.
Repeat for a total of 5 rows.
Center panel
Work only 24 single crochets.
Continue back and forth over these for 10 rows.
Handle 2
After the tenth row, work 24 single crochets + 71 chains.
You will have 95 stitches in total.
Work 5 rows of single crochet across these stitches.
Panel
Work only 24 single crochets.
Continue for 10 rows.
Seams and finishing
Fold the work in half.
Sew the sides of the panels, the bottom of the bag, and the base of the handles.
Finish and weave in the ends.
This is the moment when your bag takes shape and becomes you.
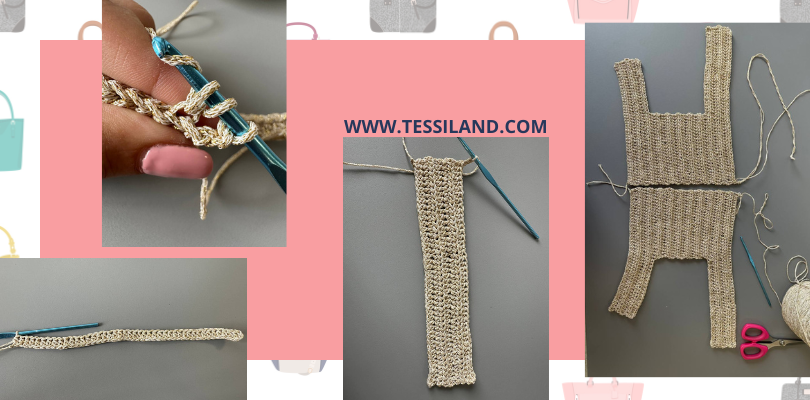
Model 2 - Japanese Knot with two panels (gold cream lurex version)

Materials:
- 1 spool of Thai Lurex Gold Cream
- 3 mm crochet hook
- Yarn needle
- Scissors
You can find them here:
Instructions:
Short handle (panel start)
Chain 44 + 3 to turn.
Work 45 half double crochets in back loop only.
Continue for 5 rows.
Center panel
Work only the 24 central stitches.
Continue for 9 rows in back loop only.
Long handle (panel end)
After the 9th row, add 31 chains.
Work half double crochet in back loop only across the entire row.
Continue for a total of 5 rows.
Repeat to create the second panel.
Assembly
Overlap the panels and sew the base with precise stitches.
Join the short and long handles.
Sew the sides, leaving an open space at the top.
Insert the long handle into the short one to close.
Frequently Asked Questions (FAQ)

1. Is this project suitable for crochet beginners?
Yes! Both models – the single panel and the two-panel versions – are explained step-by-step and suitable even for those with basic crochet knowledge.
2. What is the difference between the two models?
The first model (navy blue) is made using a single panel, while the second (gold cream with lurex) is created with two separate panels. Both use the Japanese knot technique, but with two different styles and levels of finish.
3. How long does it take to make a bag?
On average, with a bit of practice, you can complete either bag in about 3–4 hours – perfect for a weekend or evening project.
4. Can I adjust the size of the bag?
Absolutely! You can vary the number of starting chains to create a larger or more compact version, maintaining the handle proportions to achieve the knot effect.
5. What kind of crochet hook should I use?
For the Thai Sublime model, a 4.5 mm crochet hook is recommended, while for the Thai Lurex model, a 3 mm hook is better.
6. Can I wash the finished bag?
Yes, but we recommend hand washing in cold water, especially if you’ve used lurex yarn, to preserve its shine and shape.
7. Is this a trending model for summer 2025?
Absolutely yes! Crochet bags, especially with a Japanese knot closure, are among the most loved and versatile 2025 crochet trends to show off in the city and on holiday.
Common Issues and Solutions

The panel curls or doesn’t stay flat.
Solution: You might be working too tightly. Try relaxing your yarn tension or using a crochet hook half a size larger. If the yarn is Thai Sublime or Thai Lurex, a light steam blocking can help flatten your work.
The two handles don’t align perfectly at the end.
Solution: Count your stitches again! Sometimes 1–2 extra or missing stitches can throw off the alignment. Make sure the rows and chains are the same on both sides before sewing.
The bag edges look crooked after joining
Solution: Use stitch markers before starting to sew. Marking corners and key points helps maintain shape. If you’re using lurex yarn, precise stitching is even more important for an elegant finish.
I can’t slide one handle into the other properly
Solution: Check that the long handle is actually longer than the short one! If it’s not, you can add a few extra rows just to the long handle before sewing. That way, the Japanese knot will work perfectly.
The finished bag doesn’t have the shape I wanted
Solution: Gently steam (without direct ironing) with an iron, or insert some tissue paper or a pouch inside to shape the bag and leave it “resting” overnight.
Bonus creative tip:
Used the wrong color or want to change style halfway through? Don’t panic! You can turn the project into a color block bag by alternating two yarns (e.g., Thai Sublime + Thai Lurex). The mix will be even more fashionable for summer 2025.
Mistakes to Avoid

1. Not measuring the handles properly
Why it’s a problem: The Japanese knot only works if one handle is truly longer than the other. If they’re too similar, it becomes impossible to thread and close the bag.
Solution: Follow the number of chains indicated in the two models carefully and always compare the lengths before sewing.
2. Forgetting to count stitches in the panels
Typical error: Losing count and ending up with panels of different sizes.
Solution: Use stitch markers every 10 stitches or count out loud each row. A small trick that avoids big frustration!
3. Pulling the yarn too tightly when sewing
Result: The bag warps, especially with less stretchy yarns like Thai Lurex.
Solution: Keep a light and even tension while sewing the sides. And remember: you’re not lacing up shoes – you’re sewing with style.
4. Skipping the step of weaving in the yarn tails
Aesthetic and practical risk: Yarn ends popping out after a few uses.
Solution: Carefully weave in the tails inside the work using a yarn needle or hook. For extra security, use transparent sewing thread to lock them in.
5. Using an unsuitable yarn
Risk: The knot won’t hold, and the shape won’t stay.
Solution: Choose yarns recommended for structured bags. For this project, Thai Sublime and Thai Lurex are ideal because they are sturdy, elegant, and have the right thickness.
6. Not testing the size with a swatch first
Beginner mistake: Freestyling can work for a scarf, not for a bag!
Solution: Always make a small swatch to test tension and how the yarn behaves with your hook.
Remember: the difference between a creative experiment and a magazine-worthy bag is in the details (and the mistakes you avoid!).
Save this tutorial and tag us when you make it on Instagram @tessiland.
A perfect mix of elegant crochet and seaside aperitif glam spirit.
Want to make it too? Now you know everything about summer 2025’s top trend.
Rosaria Tessiland®
.jpg)
Related posts
 Between style and sustainability: the raffia bag is the must-have for spring and summer.


