Two bags, two styles, one single trend. The Japanese knot takes over summer 2025 with two irresistible crochet...
Search in blog
Blog categories
Latest posts
-
 Two crochet bags: the Japanese knot tutorial that speaks the language of the Hadid sisters – summer 2025 editionRead more
 -
") Crochet under the sun: summer 2025 fashion to show off with your best friend (handmade hats included!)Read more
Crochet under the sun: summer 2025 fashion to show off with your best friend (handmade hats included!)Read moreTwo crochet hats perfect for summer: a bucket hat and a mesh hat — fresh, trendy, and easy to make with our free...
-
 The coolest clutch of summer 2025 — and you can make it in 2 must-have colors. Chiedi a ChatGPTRead more
Two irresistible colors, one project: the most wanted crochet clutch of summer 2025 is easy to make with the...
-
 Athens the crochet bucket bag to show off at the beachRead more
Last project of our Summer Crochet series! Athens is the crochet bucket bag inspired by the colors and elegance of...
-
 Paros the trivet fish a seaside-style decoration for your beach house and beyondRead more
Want to bring a touch of summer and seaside style into your kitchen? With our crochet tutorial, you can make Paros –...
Popular posts
-
 Crochet bags, the models for spring-summer.One of the most searched accessories on the web, patterns, tutorials, ideas, projects, accessories, here's how to...Read more
 -
 Crochet bags for spring summer 2024. 5 models of handmade sling bags.Discover the latest trends for Spring/Summer 2024 with our exclusive guide to 5 crochet sling bag models. Perfect for...Read more
 -
 The Crochet Net Bucket Bag: A Trendy Accessory for 2024Learn how to make a crochet net bucket bag with our simple and detailed tutorial. Use elastic cord, a size 5 crochet...Read more
 -
 Crochet rugs, a passion that is becoming a trend.In this article, dive into the art of crochet rugs and discover how to create unique and personalized pieces for your...Read more
 -
 From runways to street style: the trendiest crochet bags.Are you also passionate about handmade items and want to create your own capsule collection of crochet bags? Here are...Read more

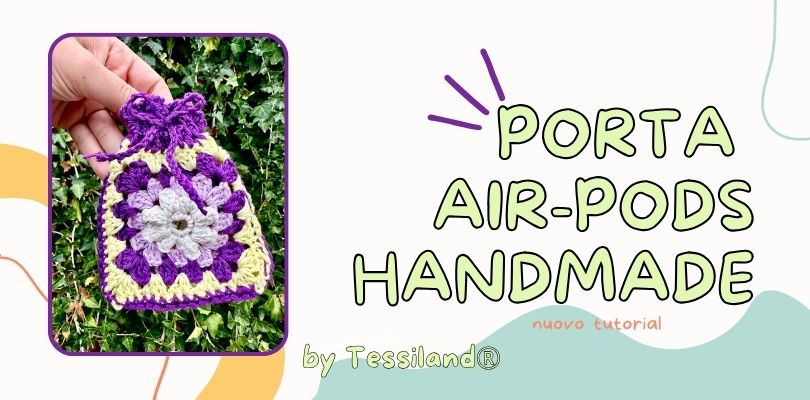
Handmade AirPods case. A cool and easy-to-make creative crochet project.
If you are looking for a creative project to test your crochet skills and create a cute and functional accessory, you're in the right place! Today, we will create together an adorable Granny AirPods Case, which will not only keep your earbuds safe but can also accommodate other small items. Before we begin, make sure you have everything you need.
Materials Needed
Here's a list of the materials you'll need:
- Crochet hook size 3
- crochet hook
- Cotton thread in 4 or 5 different colors
- cotton
- iggy iggy iggy
- Scissors
- scissors
- Wool needle
- needles
Once you have all the materials at hand, we are ready to begin!
How to Make the Granny Bag
Step 1: Start the Work.
Let's start from the center of our project. To do this, we will start a magic ring with 8 single crochets. This magic ring will serve as the base for our pouch.
Step 2: Work on the Central Flower
In the slip stitch that we will use to close the ring, chain 3. These chains will act as the starting point for the petals of our flower.
Now, work 5 double crochets inside the same magic ring. After completing the 5 double crochets, pull the yarn through the last stitch of the first double crochet and into the first stitch of the last double crochet. Insert the yarn into the loop of the double crochet and pull gently. This way, we will have created our first petal.
Step 3: Continue Creating the Petals
Now, chain 3 and proceed to create a new petal using the same procedure described above. Repeat this process until you have created a total of 8 petals around the magic ring. These petals will form our lovely central flower.
Step 4: Continue with the Granny Square Pattern
Now that we have completed our lovely central flower, it's time to move on to creating the Granny Square pattern that will make up the main part of our pouch. Change the yarn color according to your preference, and start the work.
Begin by creating the first side of the Granny Square. Start with 3 chains, which will act as the first double crochet of the new round. Then, work two double crochets in the same space.
Now, move to the space between the next two petals of the central flower and work three more double crochets. These double crochets will form the second side of our Granny Square.
Continue the pattern, working 3 chains and, in the same space between the petals, another three double crochets. These will be the three sides of our square.
Now, move to the next space between the petals and work three double crochets. This will be the fourth side of the Granny Square.
Continue in the same way for the rest of the round: skip the next space and work 3 double crochets, then in the next space, work 3 double crochets followed by 3 chains and another 3 double crochets in the same space. This sequence will repeat along all four sides of our square.
Once you have completed the last side, close the round with a slip stitch.
Step 5: Repeat the Pattern for Your Granny Square
Now that you have completed the first round of your Granny Square, you can continue with the pattern until the square reaches the desired size for your pouch. Remember to change the yarn color as you prefer to create a unique and eye-catching color scheme.
The Granny Square pattern is highly customizable, so don't hesitate to experiment with different color combinations and sizes. Once your Granny Square has reached the desired size, you are ready to move on to the next phase of the project: attaching the central flower to the square to create the front part of the pouch.
Step 6: Closing the Pouch
Work on the top part of the tile to create the part that we will use as the pouch's closure.
Chain 2 starting from the right corner of your tile, then in the space created on the granny pattern where we worked 3 double crochets + 3 chains + 3 double crochets, chain 2 and create a single crochet, continue with 1 single crochet for all the following stitches.
Once you have created the tile, repeat the process for a new one.
Step 7: Joining Tiles
Decide whether to sew the two tiles with a matching color or use one of the ones you've used. I chose purple to better distinguish the stitches.
Insert the crochet hook into the corner of the two tiles, making sure they align perfectly, insert it into the two loops of one tile and then into the two of the other, pull the yarn through and tighten to join the two parts, thus closing 3 sides, leaving the one where we worked the single crochets from 2 chains open.
Finish with stitches if necessary.
Step 8: Pouch Closure
Work on the upper band, the one you created as the pouch's closure, with 2 chains and continue for the entire round with 1 single crochet in each stitch.
Do this for two rounds.
Step 9: Work Finished.
Now, start a new work with approximately 60 chains.
Insert the crochet hook into the middle round of single crochets, insert it into one single crochet and then into one not, pull the chain yarn, so your pouch will have the useful strap for opening and closing.
Remember to always have your AirPods and other items you want to keep safe at hand. Your Granny Porta AirPods pouch will be both elegant and functional, just like your crochet work!
Once the central flower is completed, our Granny Porta AirPods pouch is ready to be used. Experiment with different colors and personalize your pouch to make it truly unique.
Thank you for following this crochet tutorial.
We hope we have been clear and comprehensive.
We look forward to your next project.
Rosaria Tessiland®
.jpg)
