Two bags, two styles, one single trend. The Japanese knot takes over summer 2025 with two irresistible crochet...
Search in blog
Blog categories
Latest posts
-
 Two crochet bags: the Japanese knot tutorial that speaks the language of the Hadid sisters – summer 2025 editionRead more
 -
") Crochet under the sun: summer 2025 fashion to show off with your best friend (handmade hats included!)Read more
Crochet under the sun: summer 2025 fashion to show off with your best friend (handmade hats included!)Read moreTwo crochet hats perfect for summer: a bucket hat and a mesh hat — fresh, trendy, and easy to make with our free...
-
 The coolest clutch of summer 2025 — and you can make it in 2 must-have colors. Chiedi a ChatGPTRead more
Two irresistible colors, one project: the most wanted crochet clutch of summer 2025 is easy to make with the...
-
 Athens the crochet bucket bag to show off at the beachRead more
Last project of our Summer Crochet series! Athens is the crochet bucket bag inspired by the colors and elegance of...
-
 Paros the trivet fish a seaside-style decoration for your beach house and beyondRead more
Want to bring a touch of summer and seaside style into your kitchen? With our crochet tutorial, you can make Paros –...
Popular posts
-
 Crochet bags, the models for spring-summer.One of the most searched accessories on the web, patterns, tutorials, ideas, projects, accessories, here's how to...Read more
 -
 Crochet bags for spring summer 2024. 5 models of handmade sling bags.Discover the latest trends for Spring/Summer 2024 with our exclusive guide to 5 crochet sling bag models. Perfect for...Read more
 -
 The Crochet Net Bucket Bag: A Trendy Accessory for 2024Learn how to make a crochet net bucket bag with our simple and detailed tutorial. Use elastic cord, a size 5 crochet...Read more
 -
 Crochet rugs, a passion that is becoming a trend.In this article, dive into the art of crochet rugs and discover how to create unique and personalized pieces for your...Read more
 -
 From runways to street style: the trendiest crochet bags.Are you also passionate about handmade items and want to create your own capsule collection of crochet bags? Here are...Read more

Working with knitting needles. Where do I start?
If you've landed on this article, you're probably an enthusiastic beginner or someone looking to refresh their skills in knitting.
Welcome to the wonderful world of knitting!
Whether you're a man or a woman, knitting is a passion that transcends gender, age, and culture.
TOOLS
To learn knitting, you don't need complicated equipment: YARN and NEEDLES.
As you gain experience, you can acquire new materials to have fun using different types of yarns. To try out various yarns of different thickness, you will need knitting needles of various sizes, a cable needle for making cables, and a set of double-pointed needles or a circular needle if you want to try knitting in the round. For working flat, you'll need a tape measure or ruler, stitch markers, scissors, needles, and other accessories.
ESSENTIAL TOOLS
Knitting needles are an investment because you'll use them many times. If you take care of them, they will last for years. I recommend opting for a set if you're willing to experiment with multiple projects; otherwise, a single pair will do.
DOUBLE-POINTED NEEDLES
They come in different lengths and sizes, sold in sets of 4 or 5 pieces, called a SET OF NEEDLES.
CIRCULAR NEEDLES
They are two tips of needles connected by a flexible cord, called cable, made of nylon or plastic. The length of the needle is measured from tip to tip, and the cords range from 40 to 120 cm.
STRAIGHT NEEDLES
Pairs of needles are available in lengths of 40 cm. Most needles are made of aluminum, in a gray pearl color, but some are nickel-plated. The larger needles are made of plastic to reduce weight. Bamboo knitting needles are lightweight and warm to the touch.
TAILOR'S TAPE MEASURE
The most useful tailor's tape measures are soft and flexible, allowing you to take measurements both on the body and the project.
NEEDLE AND HOOK GAUGE
Plastic needle and hook gauge. To accurately determine the needle diameter and match it to the instructions.
SCISSORS
Choose scissors that are neither too small nor too large but are sharp.
NEEDLES
You will need round-tipped needles of various sizes for different types of yarn.
JACQUARD THIMBLE
A Jacquard thimble can be used for working with multiple colors.
BOBBINS OR SHUTTLES
Bobbins, or shuttles, prevent yarns from hanging loose in intarsia work.
CURVED NEEDLES
Some curved needles have a bend or curve that helps keep the stitches on the needle.
STITCH HOLDERS
Small stitch holders will prevent stitches from falling off the needle if you need to interrupt your work in the middle of a row.
CROCHET HOOK
A crochet hook helps pick up dropped stitches from the needle and can be used to finish your work.
OTHER
Lastly, for fun, though not strictly necessary, pom-pom makers and spindles are a fun way to get kids interested in yarn, and they are also useful for creating decorative details.
YARNS
Feeling the yarn between your fingers is one of the pleasures of knitting.
You can experiment with different yarns available in our catalog, from fine to smooth, solid colors to gradients, synthetic or natural. Yarns come in the form of skeins. The composition of the yarn and the type of treatment determine the amount of yarn you will get from a certain weight, so two skeins of the same weight may have different lengths.
SMOOTH YARNS
Also called classic yarns, these smooth yarns made of wool, cotton, or blended fibers are always reliable for knitting. No matter how fine or thick they are, they will always highlight the stitch patterns beautifully.
TEXTURED YARNS
Fibers like alpaca, silk, and linen produce yarns that look smooth on the skein but have a distinctive character in knitting. Mohair and angora can be used alone or blended with other fibers to achieve a soft and airy surface. Speckled and marled yarns create a tweed-like effect, while roving yarns are single-ply and loosely twisted, resembling handspun yarns.
FANCY YARNS
Also known as fashion yarns, they change from season to season. The velvety texture of chenille is one of the all-time favorites. One year, stores are full of bouclé fabrics, the next year, you can only find metallics. Try a bit of everything, from shiny ribbon yarn to the richest bulky yarns.
SPECIALTY YARNS
Some yarns have specific features for particular purposes. One example is yarns for knitting socks. Sock yarns are generally lightweight and may contain elastane, nylon, or both to create snug and warm socks. For socks, striped and hand-dyed yarns are especially trendy.
IMPROVISED YARNS
Experiment with cord or raffia, tear strips of cotton fabric and knot them together, or cut spirals from fabric, plastic sheets, faux leather, and suede, and sew the ends together. This way, you can create a continuous yarn to knit with.
GETTING STARTED
First, get yourself some medium-sized needles and a smooth, medium-weight pure wool yarn. Once you have all your supplies, start practicing the following steps, and soon you'll be able to knit with skill and uniformity.
Knitting is an art that uses both hands, with stitches worked from one needle to the other from left to right. To begin, sit comfortably and relax! Knitting requires good coordination between your hands and eyes, which is hard to achieve if you're tense.
There are many ways to hold and control the yarn and needles, but none is absolutely the best.
Experiment until you find what's most comfortable for you.
HOLDING THE YARN
For the yarn to flow smoothly on the needle, pass it over and under your fingers, leaving your fingertips free to manipulate the needles and control the yarn.
The methods shown below allow the yarn to flow continuously and evenly. In each case, the working end of the yarn always slides over the index finger, while the first part of the yarn directly from the skein slides over the pinky finger.
SMOOTH FEED [RIGHT HAND]
The simplest method is to pass the yarn over and under the fingers of the right hand.
BETTER GRIP [RIGHT HAND]
Wrapping the yarn around the pinky and then passing it under and over the other fingers ensures a firmer grip.
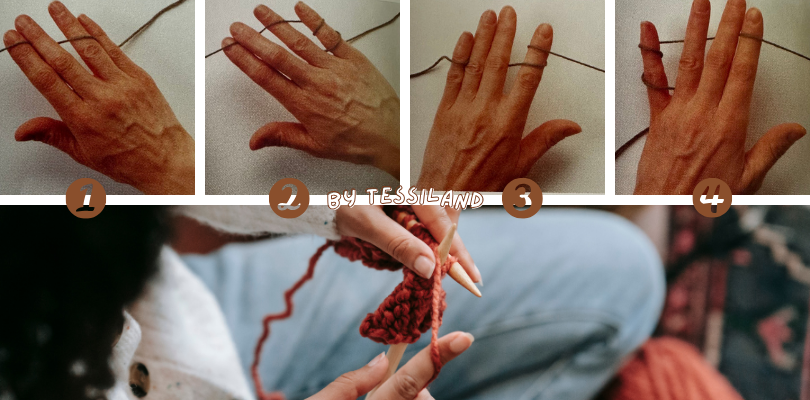
SMOOTH FEED [LEFT HAND]
If you want to hold the yarn with your left hand, pass it over the pinky, under the ring and middle fingers, and finally around the index finger.
BETTER GRIP [LEFT HAND]
Wrapping the yarn around the pinky, then under and over the other fingers provides a stronger hold.
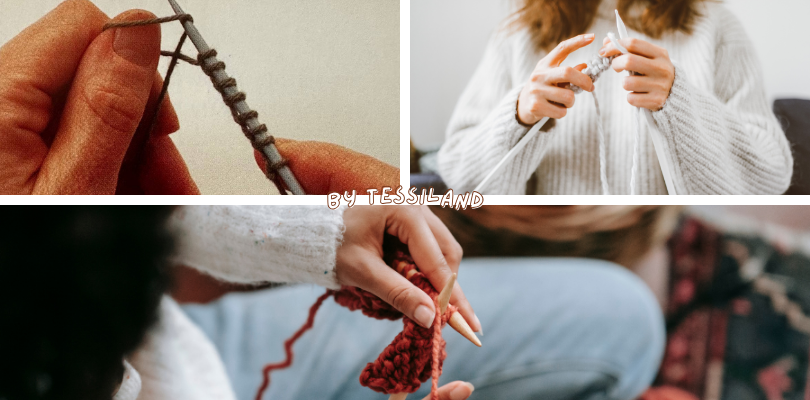
HOLDING THE NEEDLES
Once you've settled on a yarn-holding method, take a pair of needles, one in each hand, and try the following steps. Some prefer to hold the right needle as if it were a pen. Others hold it under the hand like a knife. The pen or pencil grip is more practical when using short needles, and the weight of the work on the right needle is supported by the hand and wrist. With the knife or fixed needle grip, longer needles are used, and the right needle is held steady under the arm.

FIXED NEEDLE HOLD WITH YARN IN THE RIGHT HAND
With your right hand, take one needle, hold it under your hand like a knife, and tuck the end under your arm. Take the other needle in your left hand, holding it lightly with your hand over the tip. Practice moving the left needle against the right one. As you start working, you'll find that each time you make a stitch, you can loosen your grip on the right needle.
```html
FREE NEEDLE HOLD WITH YARN IN THE RIGHT HAND
With your right hand, take one needle and hold it like a pen. Take the other needle in your left hand, holding it lightly above the tip. Try moving the needles back and forth with your fingertips, keeping your elbows relaxed at your sides. When you start casting on stitches and working, don't let go of the right needle to manipulate the yarn; instead, support it in the crease between your thumb and index finger and control the yarn with your index finger.
YARN IN THE LEFT HAND
With your right hand, take one needle and hold it like a pen or, if you prefer, like a knife. Take the other needle in your left hand. When you work, keep the yarn taut with your left hand while you catch it with the tip of the right needle.
KNITTING BASICS: CASTING ON
CASTING ON IS THE FIRST STEP IN STARTING ANY PROJECT. HERE ARE THREE OF THE MOST COMMON WAYS TO CAST ON STITCHES.
Long-tail cast-on creates a sturdy edge with a twisted, rope-like appearance, though it's not very stretchy. Thumb cast-on uses only one needle and is quite versatile. Due to its elasticity, it pairs well with ribbing. When used with the garter stitch (all knit stitches), it seamlessly blends into the rest of the work as it's essentially a row of knits. Simple loop cast-on also uses just one needle; it's straightforward and handy for buttonholes.
SLIP KNOT
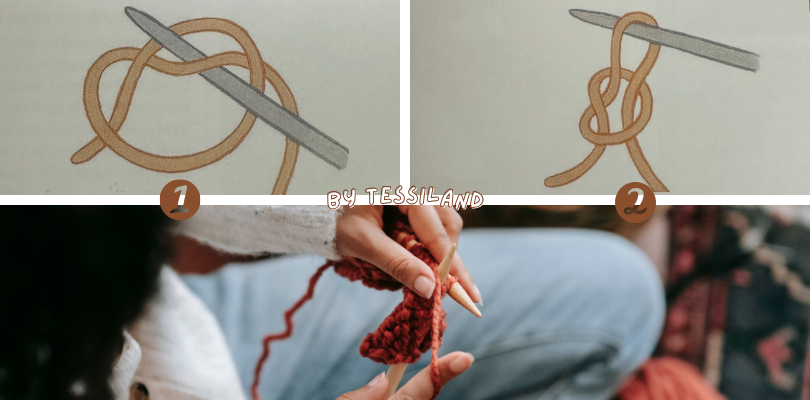
By tying a slip knot onto the needle, you'll create your first stitch. You can choose whether to wrap the yarn around your fingers or not.
- Create a loop with the yarn, pass the trailing end through the inside, and insert the needle as shown in the figure.
- Pull one end to tighten the knot, then gently pull the other end through the loop to secure the knot on the needle. At this point, you can start casting on stitches.
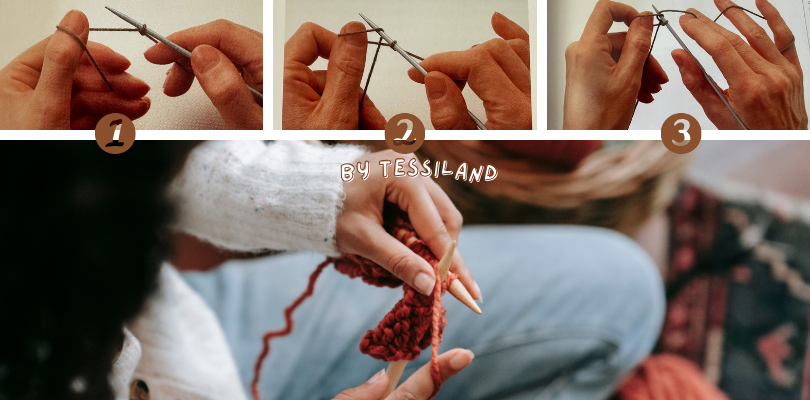
LONG-TAIL CAST-ON
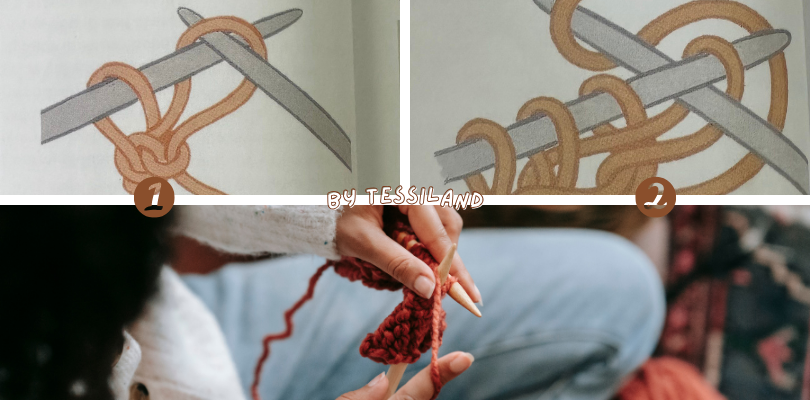
This cast-on involves creating a stitch and then transferring it from the right needle to the left.
- Make a slip knot on one needle, leaving a short tail. Holding this needle in your left hand, insert the other needle into the stitch from the front. Wrap the yarn around the right needle and pull a stitch through, then transfer it to the left needle.
- From now on, insert the right needle between the stitches each time. Transfer each new stitch to the left needle as before.
|
Tip: To create a less dense cast-on, insert the needle into the stitch instead of between stitches. This type of edge is useful for hems. |
THUMB CAST-ON
Also known as the Italian cast-on, this method involves working each stitch directly from your thumb.
- Measure a starting tail about three times the length of the edge to be cast on and make a slip knot on the needle. Hold the needle and the yarn coming from the ball in your right hand.
- Tighten the other end of the yarn with your left hand, make a loop around your thumb, and insert the right needle into the loop.
- Wrap the yarn from the ball around the needle, then pass the needle through the loop, forming a stitch. Gently pull the end to close the stitch on the needle. Repeat until you have the desired number of stitches, including the initial slip knot.
SIMPLE LOOP CAST-ON
For this cast-on, often used at the end of needles, you must be careful to tension the yarn properly. Make a slip knot on one needle, leaving a short tail. Tighten the yarn in your left hand and wrap a loop around your thumb. Insert the needle into the loop, slide out your thumb, and gently pull the yarn, creating a stitch on the needle.
|
Tip: Measuring a starting tail about three times the width of the edge to be cast on with the thumb can be tricky, especially with a large number of stitches. An alternative is to create a slip knot that joins the ends of two yarn balls. Hold one end with your left hand and the other with your right hand. Proceed with casting on the stitches. Once you have the desired number of stitches, release the yarn from your left hand and continue working with the yarn from your right hand. This method is also used to create a provisional cast-on. You use a length of soft, contrasting yarn to hold with your left hand. Later, this yarn is removed, and the stitches on the needle are worked in the opposite direction. |
Knitting is an ancient art, but it is also incredibly therapeutic and rewarding. Whether you are seeking a relaxing hobby, a way to create personalized gifts, or even a business opportunity, knitting offers endless possibilities. With patience, practice, and passion, you too will become a master of knitting.
Good luck!
Rosaria Tessiland®
.jpg)
