Two bags, two styles, one single trend. The Japanese knot takes over summer 2025 with two irresistible crochet...
Search in blog
Blog categories
Latest posts
-
 Two crochet bags: the Japanese knot tutorial that speaks the language of the Hadid sisters – summer 2025 editionRead more
 -
") Crochet under the sun: summer 2025 fashion to show off with your best friend (handmade hats included!)Read more
Crochet under the sun: summer 2025 fashion to show off with your best friend (handmade hats included!)Read moreTwo crochet hats perfect for summer: a bucket hat and a mesh hat — fresh, trendy, and easy to make with our free...
-
 The coolest clutch of summer 2025 — and you can make it in 2 must-have colors. Chiedi a ChatGPTRead more
Two irresistible colors, one project: the most wanted crochet clutch of summer 2025 is easy to make with the...
-
 Athens the crochet bucket bag to show off at the beachRead more
Last project of our Summer Crochet series! Athens is the crochet bucket bag inspired by the colors and elegance of...
-
 Paros the trivet fish a seaside-style decoration for your beach house and beyondRead more
Want to bring a touch of summer and seaside style into your kitchen? With our crochet tutorial, you can make Paros –...
Popular posts
-
 Crochet bags, the models for spring-summer.One of the most searched accessories on the web, patterns, tutorials, ideas, projects, accessories, here's how to...Read more
 -
 Crochet bags for spring summer 2024. 5 models of handmade sling bags.Discover the latest trends for Spring/Summer 2024 with our exclusive guide to 5 crochet sling bag models. Perfect for...Read more
 -
 The Crochet Net Bucket Bag: A Trendy Accessory for 2024Learn how to make a crochet net bucket bag with our simple and detailed tutorial. Use elastic cord, a size 5 crochet...Read more
 -
 Crochet rugs, a passion that is becoming a trend.In this article, dive into the art of crochet rugs and discover how to create unique and personalized pieces for your...Read more
 -
 From runways to street style: the trendiest crochet bags.Are you also passionate about handmade items and want to create your own capsule collection of crochet bags? Here are...Read more

How to make a crochet granny square! Pattern for beginners.
A world of creativity with crochet
The art of crochet has spanned centuries, passed down from generation to generation, and always remaining a fascinating form of creative expression. One of its most iconic creations is undoubtedly the granny square. This simple yet charming pattern is often the first step for many beginners in the intriguing universe of crochet.
If you're looking for a starting point or are simply curious to add a new skill to your collection of manual abilities, you're in the right place. In this article, I'll guide you step by step through the process of creating a granny square, ensuring that every stitch and every round are clear even for those holding a crochet hook for the first time, just like me trying this project for the first time.
Whether you want to make a blanket, a bag, or simply add a handmade touch to your home, the granny square will be your entry ticket into a world of endless possibilities. Get your crochet hook and yarn ready, and join me on this creative journey!
Materials Needed to Make a Crochet Granny Square
Before starting with the granny square tutorial, it's essential to have all the necessary materials at hand. Here's the list of tools and materials you'll need:
Crochet hook: The size of the hook will depend on the type and size of the yarn you choose. For instance, a medium-thick yarn might require a 4mm or 5mm crochet hook.
In this tutorial, I used a 3.5 crochet hook from the Ergo Maxysize set
Yarn: You can choose from a wide range of yarns. It all depends on the result you want to achieve in terms of color, texture, and square size. For beginners, a medium-thick acrylic yarn is often a good choice to start with.
I chose three colors from the Bravissimo50 palette
Scissors: Useful for cutting the yarn at the end of the work or when changing colors.
Wool needle: This will be needed to hide and secure the yarn ends at the end of the work.
Stitch marker: Although not strictly necessary for a granny square, it can be handy to mark the beginning or end of a round, especially for beginners.
Tailor's tape measure: Useful for measuring the size of your square and ensuring uniformity if you want to make multiple squares for a larger project.
Remember that the choice of colors and materials may vary depending on the specific project you have in mind. If you wish to make a multicolored blanket, for example, you will need various shades of yarn. However, the important thing is to ensure that the chosen yarn is consistent in terms of thickness and composition to obtain a uniform result.
Steps to Make a Crochet Granny Square
Now that we have all our materials ready, let's dive into the actual process of making a granny square. Here are the step-by-step instructions:
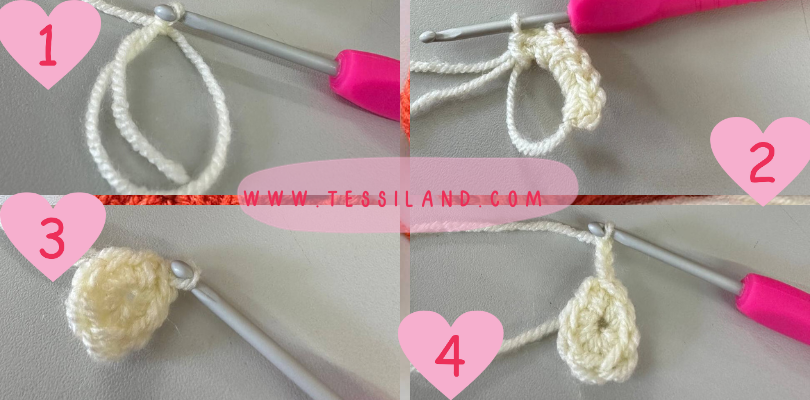
1. Starting Ring: Begin by making a slip knot on your crochet hook. Then chain 4 stitches. Join the last chain with the first chain using a slip stitch. You will have formed a small ring.
2. Round 1: Chain 3 (this counts as the first double crochet). Now make 2 double crochets into the ring. This will form your first cluster of stitches. Chain 2, then make 3 double crochets into the ring. Repeat this process twice more, so you have 4 clusters separated by 2 chains. Join the last cluster with the beginning chain-3 using a slip stitch.
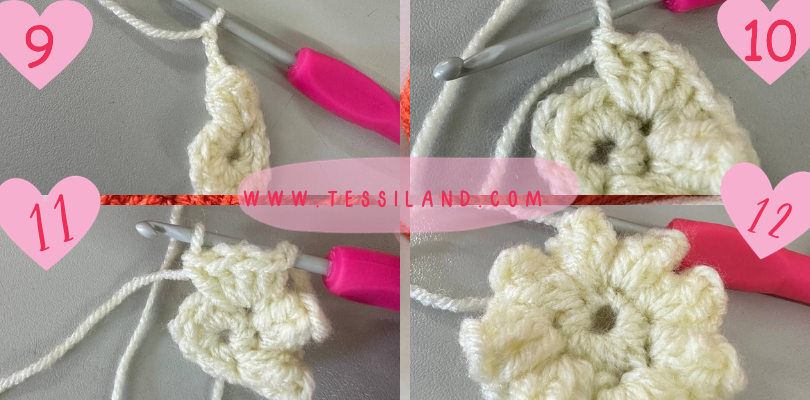
3. Round 2: Chain 3 (this counts as the first double crochet). In the 2-chain space between the clusters from the previous round, make 2 double crochets, chain 2, and make 3 more double crochets. This forms the first corner of the granny square. Repeat this process for the remaining 3 corners. Join with a slip stitch to the beginning chain-3.
Continue expanding the square in a similar fashion until you reach the desired size. Each round will increase the number of clusters between the corners.
Remember, a granny square can be as small or as large as you like. You can stop after a few rounds for a coaster-sized square, or continue to make a blanket or even a bedspread!
Once you've finished your granny square, use the wool needle to weave in the ends and secure your work.
Creating a granny square can be a relaxing and rewarding process. With just a few basic stitches, you can produce a beautiful, versatile piece. Whether you're a seasoned crochet enthusiast or just starting out, the granny square is a timeless pattern that everyone should try at least once. Happy crocheting!
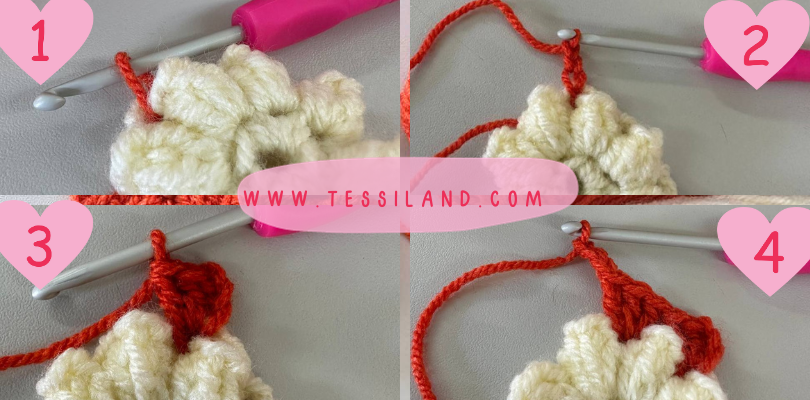
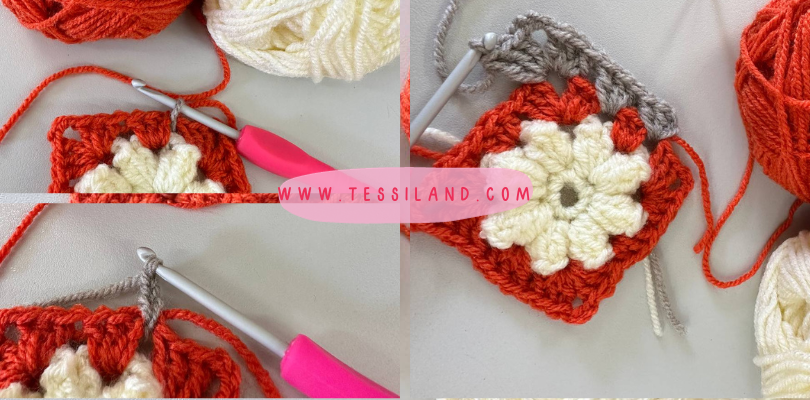
Creation of the second round:
To form the frame:
We aim the hook into a space created by the three chains worked to detach the petals in the previous step, we insert the hook to work 3 chains, which will act as a double crochet, of the new color.
Once the 3 chains are mounted, we proceed with 2 double crochets, mounting the double crochet we move to the next petal space and mount 3 double crochets, followed by 3 chains and 3 double crochets, then, with the double crochet mounted on the hook we go to pick up the yarn in the space of the next petals, and so we continue for all 8 petals. We conclude with the last round of 3 double crochets closed in the first double crochet with a slip stitch.
The round is:
- Three double crochets
- three double croch ets + 3 chains + 3 double crochets
- three double crochets
- three double crochets + 3 chains + 3 double crochets
- three double crochets
- three double crochets + 3 chains + 3 double crochets
- three double crochets
- three double crochets + 3 chains + 3 double crochets + slip stitch to close in the first double crochet.
Then we cut the yarn at about 2/3cm and arrange it on the inside of the work.
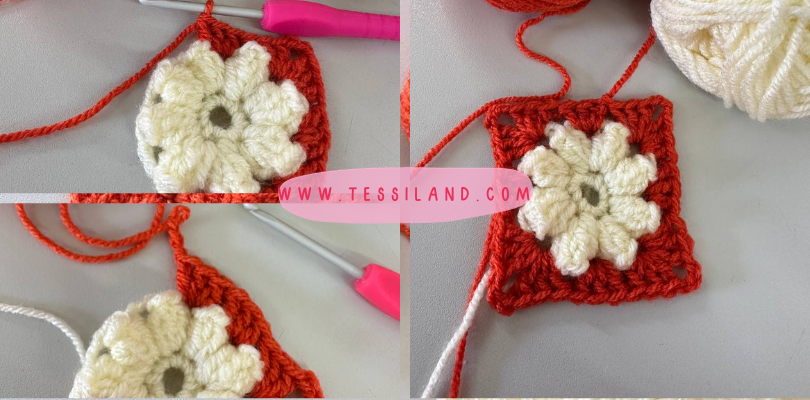
Creation of the third round:
To form the last round:
I decided to crochet a tile in 3 colors, in fact this last round I made it with the orange of the bravissimo50 yarn.
We insert the hook in the space between the groups of 3 double crochets and mount 3 chains, we continue with 2 double crochets, we move to the other space and work three double crochets, in the next space instead we work 3 double crochets followed by 3 chains and 3 double crochets.
The round is:
- Three double crochets
- three double crochets
- three double crochets + 3 chains + 3 double crochets
- three double crochets
- three double crochets
- three double crochets + 3 chains + 3 double crochets
- three double crochets
- three double crochets
- three double crochets + 3 chains + 3 double crochets
- three double crochets
- three double crochets
- three double crochets + 3 chains + 3 double crochets + 1 slip stitch to close in the first double crochet.
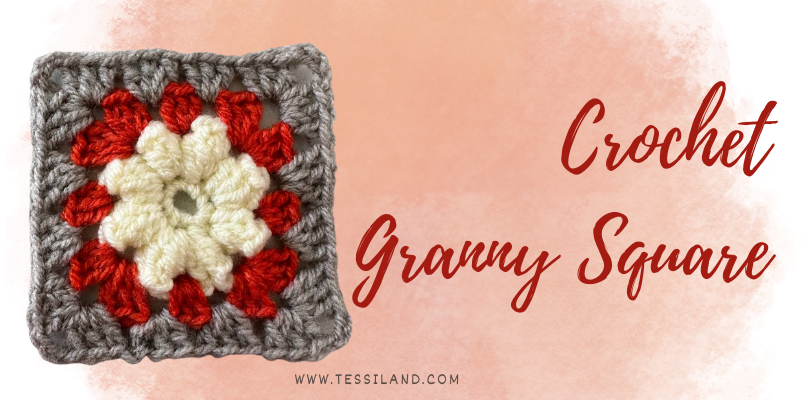
Our work ends here, but based on projects it could continue, just change color and add a group of 3 double crochets, in order to increase the size.
This tile could become the main tile of a clothing item a scarf, a cardigan, trousers, a hat, accessories like a beauty bag, a clutch, an airpods holder or a mobile phone holder with a chain to be worn over the shoulder, in short, the ideas are really many and wonderful.
And you, what will you use it for?
Rosaria Tessiland®
.jpg)
