Two bags, two styles, one single trend. The Japanese knot takes over summer 2025 with two irresistible crochet...
Search in blog
Blog categories
Latest posts
-
 Two crochet bags: the Japanese knot tutorial that speaks the language of the Hadid sisters – summer 2025 editionRead more
 -
") Crochet under the sun: summer 2025 fashion to show off with your best friend (handmade hats included!)Read more
Crochet under the sun: summer 2025 fashion to show off with your best friend (handmade hats included!)Read moreTwo crochet hats perfect for summer: a bucket hat and a mesh hat — fresh, trendy, and easy to make with our free...
-
 The coolest clutch of summer 2025 — and you can make it in 2 must-have colors. Chiedi a ChatGPTRead more
Two irresistible colors, one project: the most wanted crochet clutch of summer 2025 is easy to make with the...
-
 Athens the crochet bucket bag to show off at the beachRead more
Last project of our Summer Crochet series! Athens is the crochet bucket bag inspired by the colors and elegance of...
-
 Paros the trivet fish a seaside-style decoration for your beach house and beyondRead more
Want to bring a touch of summer and seaside style into your kitchen? With our crochet tutorial, you can make Paros –...
Popular posts
-
 Crochet bags, the models for spring-summer.One of the most searched accessories on the web, patterns, tutorials, ideas, projects, accessories, here's how to...Read more
 -
 Crochet bags for spring summer 2024. 5 models of handmade sling bags.Discover the latest trends for Spring/Summer 2024 with our exclusive guide to 5 crochet sling bag models. Perfect for...Read more
 -
 The Crochet Net Bucket Bag: A Trendy Accessory for 2024Learn how to make a crochet net bucket bag with our simple and detailed tutorial. Use elastic cord, a size 5 crochet...Read more
 -
 Crochet rugs, a passion that is becoming a trend.In this article, dive into the art of crochet rugs and discover how to create unique and personalized pieces for your...Read more
 -
 From runways to street style: the trendiest crochet bags.Are you also passionate about handmade items and want to create your own capsule collection of crochet bags? Here are...Read more

Clutch bag crochet, let's make it together.
Dear readers,
Good morning and happy Sunday! Due to the numerous requests for creating CLUTCH BAGS, I decided to get to work and, in anticipation of Christmas, create a gift idea that is easy and quick to make with a spool of cord and a few simple steps.
This clutch could be a super Christmassy gift idea, perfect for a sister, a mother, a mother-in-law, friends, or even for yourself. It’s really quick to make, and a cute idea would be to place a box of chocolates inside and wish someone a Merry Christmas. If you have a spool of yarn and don’t know what to do with it, here’s an excellent idea to use it. Let me tell you how I made it.
MATERIALS:
- 1 spool of Cordino Ternes Red
- 1 ball of Swollen Green
- 1 ball of Grace Gold
- 1 arch-shaped closure (19x9cm)
- 1 Zeta Base
- 1 crochet hook (size 5.5)
- 6 markers
- 1 pair of scissors
- 1 needle
- 1 spool of Nylon
INSTRUCTIONS:
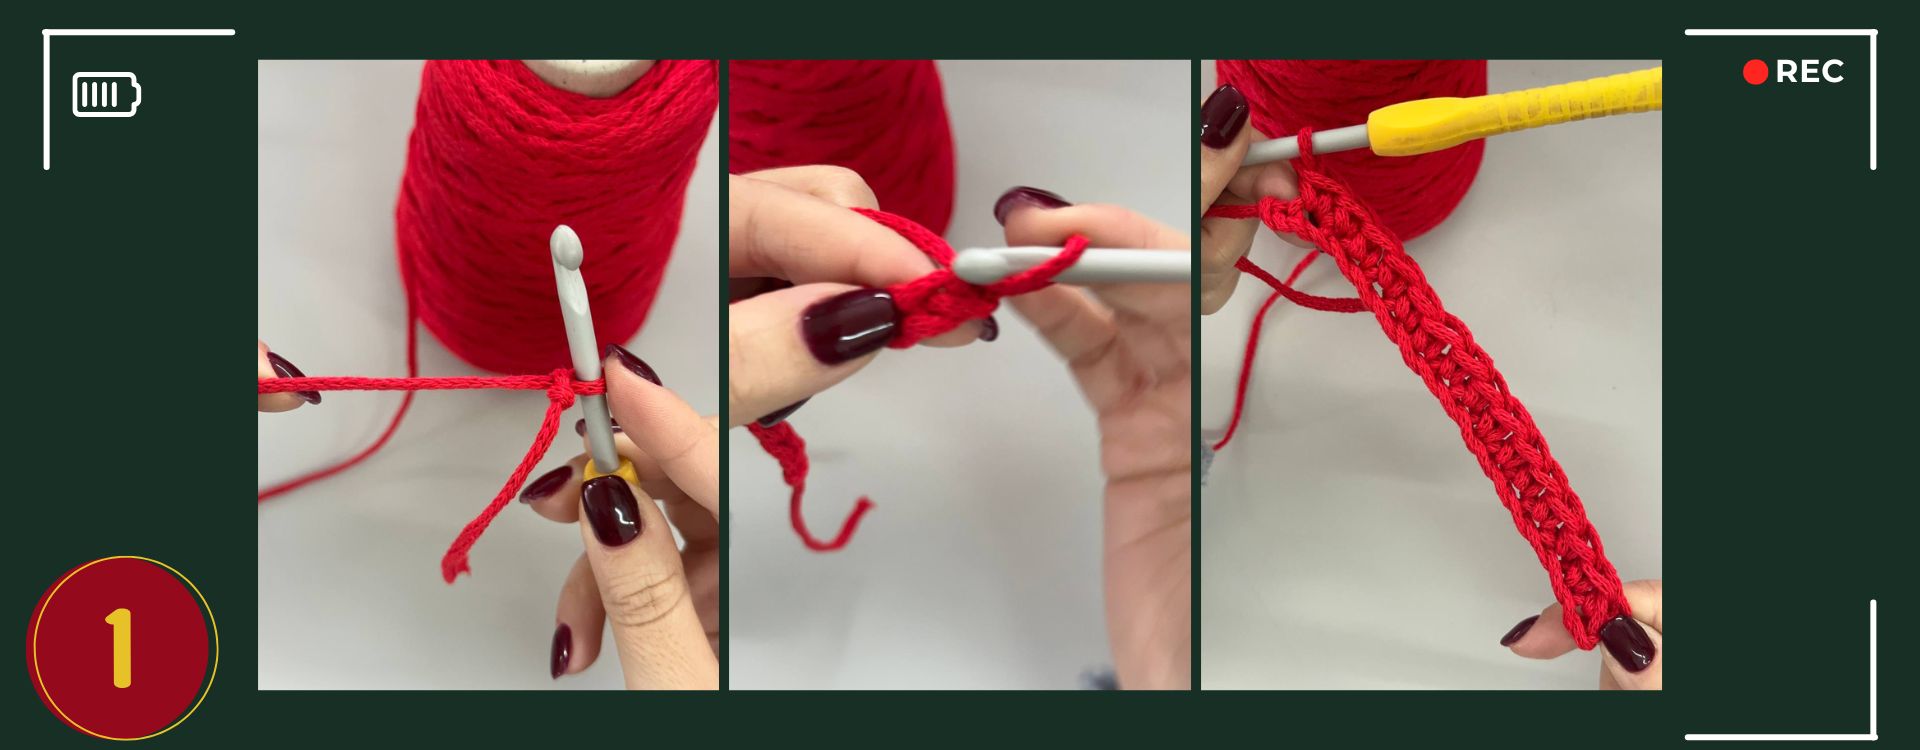
Base.
Let’s start with the base. I always orient myself by using the internal base, which I include in all models so that the bag has a well-defined base and doesn’t lose its shape when you add contents: phone, keys, wallet, tissues, etc.
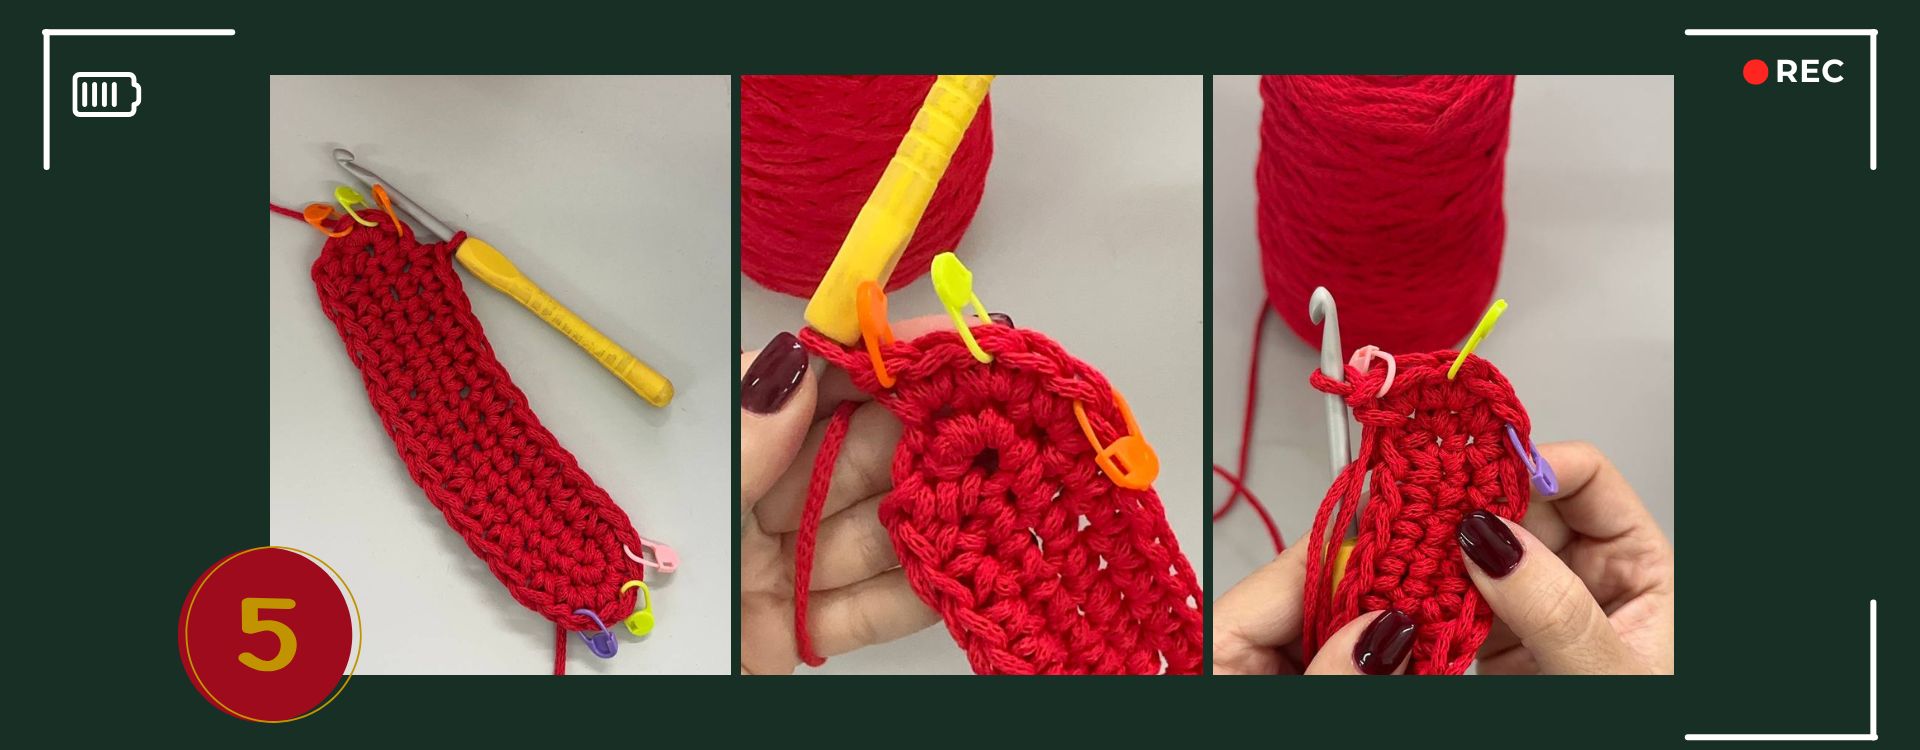
To begin, I make a starting knot followed by 15 chains. I skip the first chain and work back with a single crochet in each stitch. In the last chain, I make 3 single crochets (in the same stitch), marking each one with a marker. In total, I’ll have 3 markers.
After completing these 3 stitches, I proceed with 1 single crochet in each stitch until I reach the last stitch. As before, I make 3 single crochets in the same stitch, marking each one with a marker.
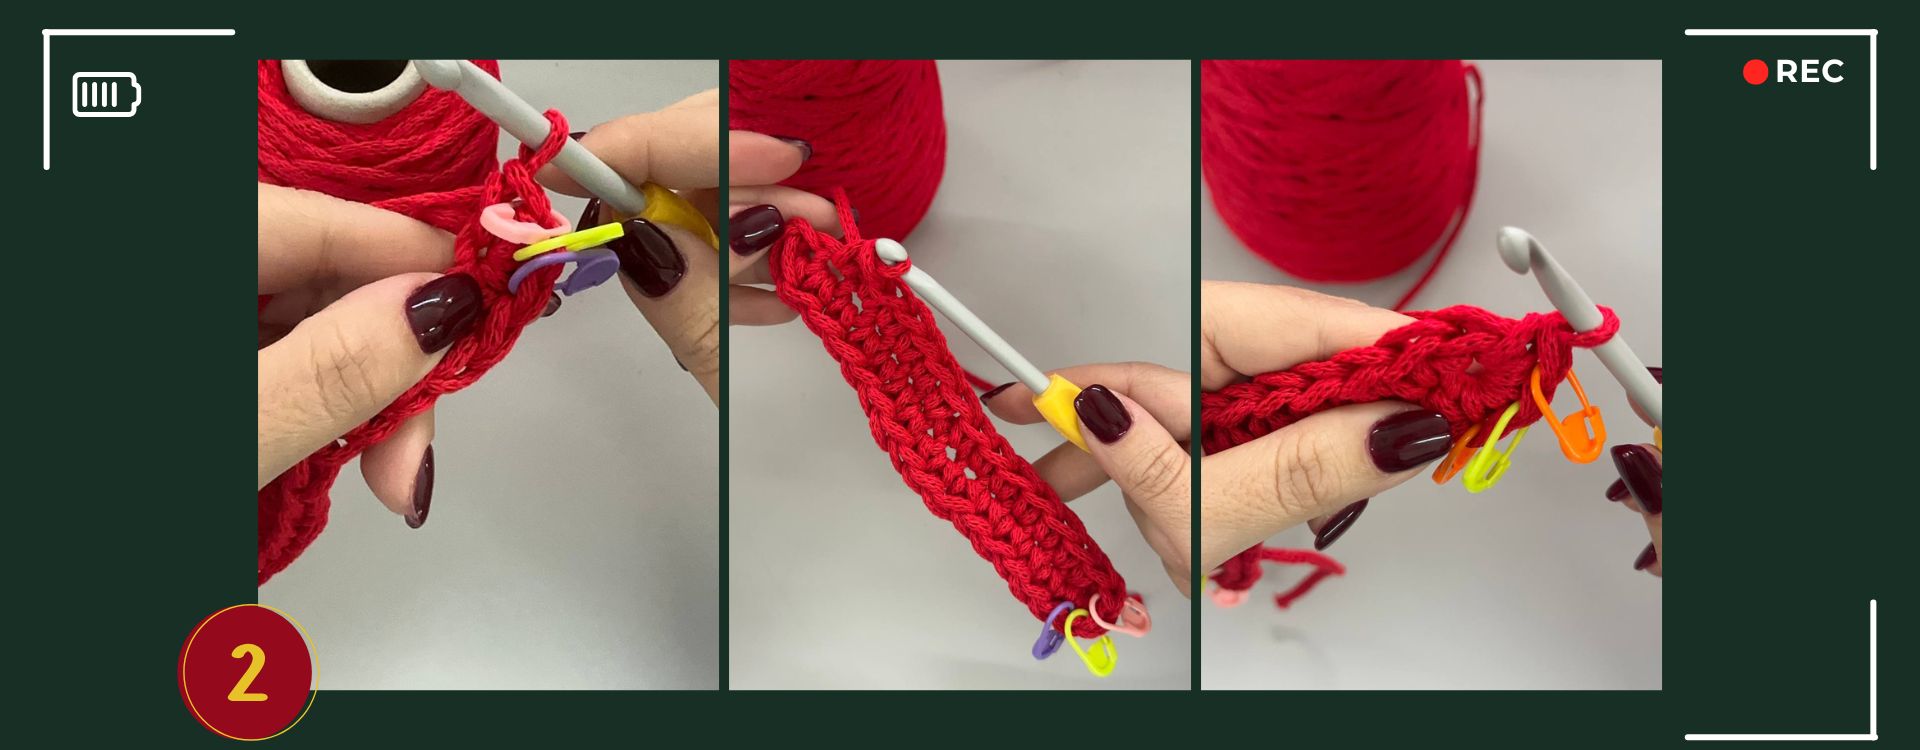
Now, pull slightly on the loop created with the cord, skip the next stitch, and insert only the crochet hook into the stitch, grab the loop, and pull it through the stitch.
Then, reinsert the crochet hook into the stitch you previously skipped, grab the loop you created, make a yarn over, and pull the loop through the stitch. Work a chain stitch, and you’re done.
This step allows the base to expand in width. After creating the chain stitch, work 1 single crochet in each stitch until you reach the first marker.
When you reach the marked stitch, remove the marker and work 2 single crochets in the same stitch. Mark the second stitch with the marker. Repeat this process for the next marker: one stitch without a marker, and the other marked. Do the same for the third marker: work 2 single crochets in the same stitch, the first without a marker, and the second marked.
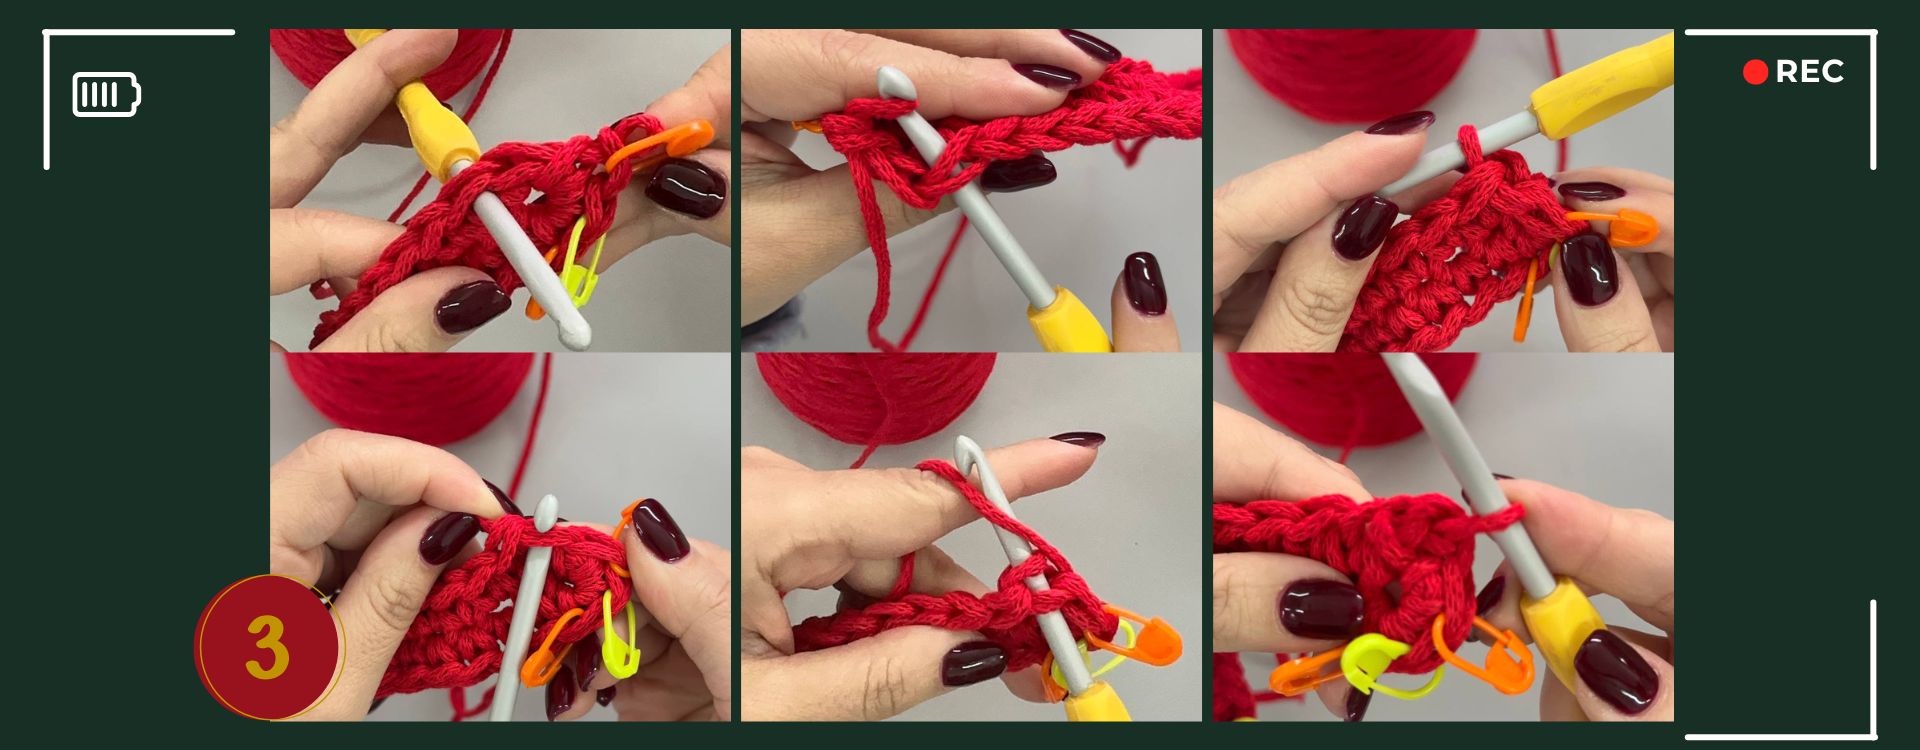
Continue to the marker on the opposite side with 1 single crochet in each stitch. At the 3 markers, make an increase: remove the first marker, work two single crochets, and place the marker on the last stitch. Repeat for the other marked points.
Then, repeat the process to widen the base. Pull slightly on the loop created with the cord, skip the next stitch, and insert only the crochet hook into the stitch. Grab the loop and pull it through the stitch. Then reinsert the crochet hook into the skipped stitch, grab the loop, make a yarn over, and pull the loop through the stitch. Work a chain stitch.

Work 1 single crochet in each stitch until the marker. Remove the marker and work 2 single crochets in the marked stitch. Repeat for the other markers. After this step, the 3 markers are no longer needed. Continue along the length with 1 single crochet, reach the marker, and work 2 single crochets, then 1 single crochet, then 2 while removing the marker, then 1, then 2. Repeat the process to create the increase in width.
And that’s how the base is completed.
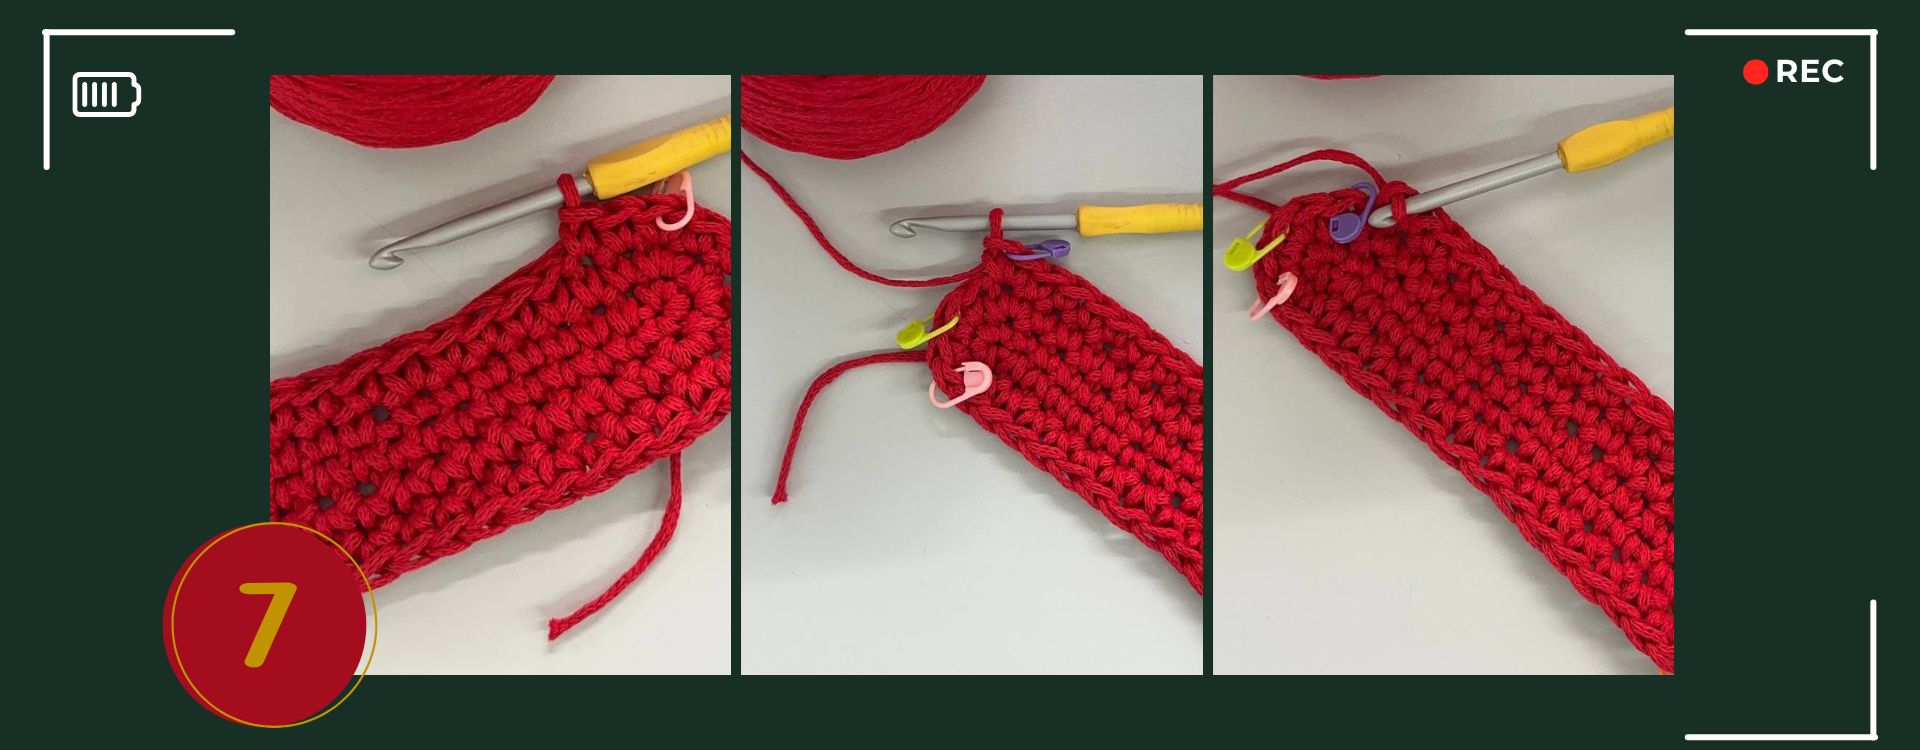
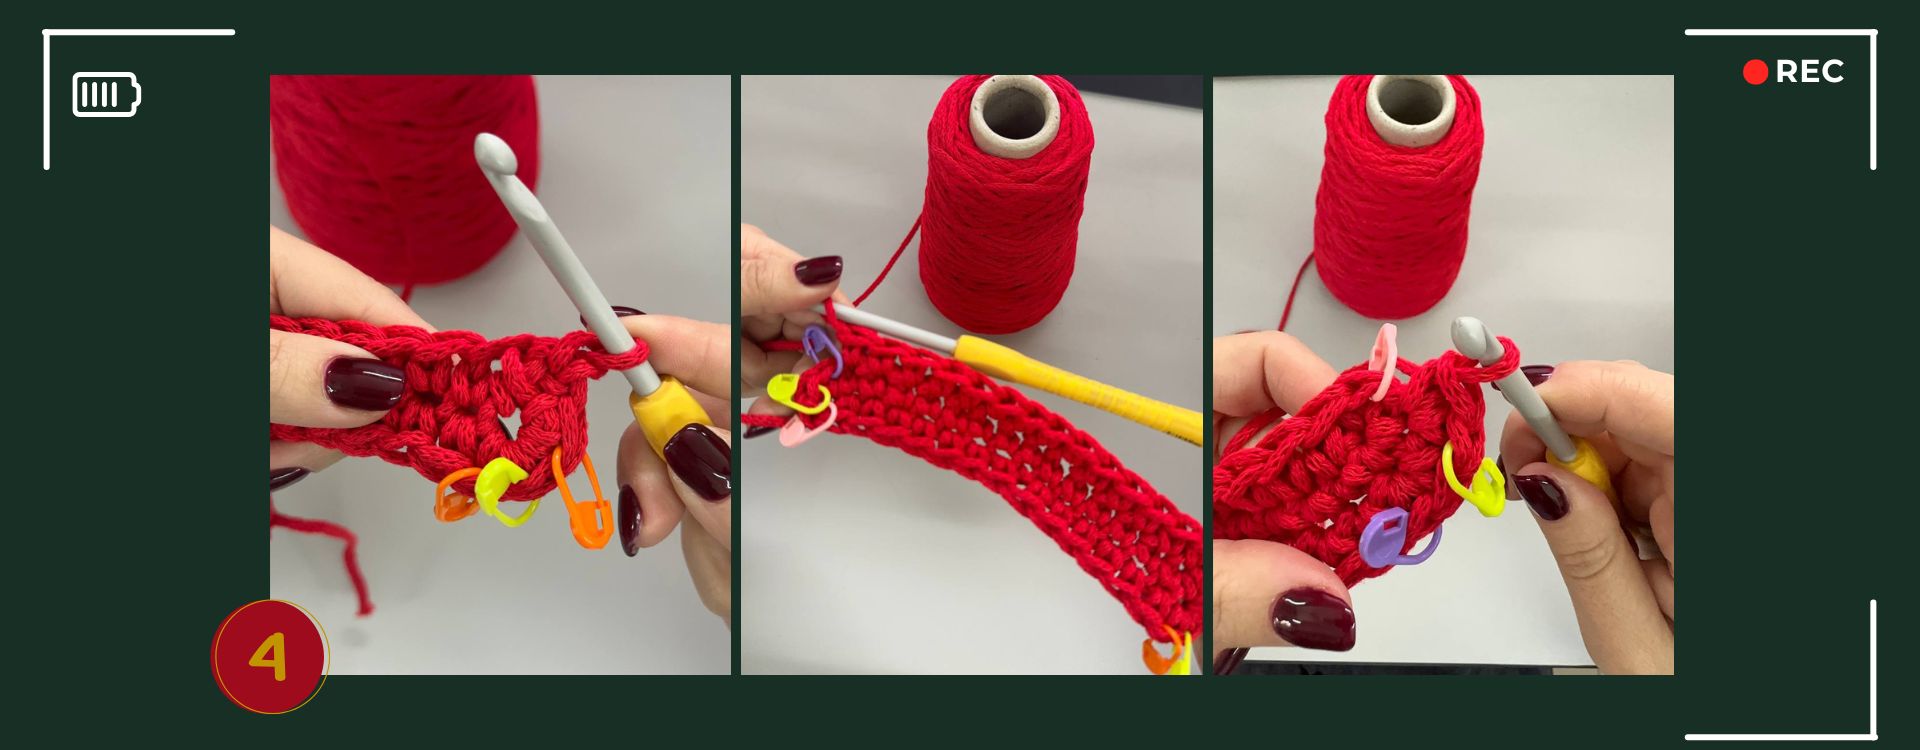
Body.
Now we work in a spiral, meaning without increases, using only 1 single crochet in each stitch for 14–15 rounds. I adjust by inserting the inner structure as the piece rises. Once the desired height is reached, I cut the yarn, leaving a bit of margin.
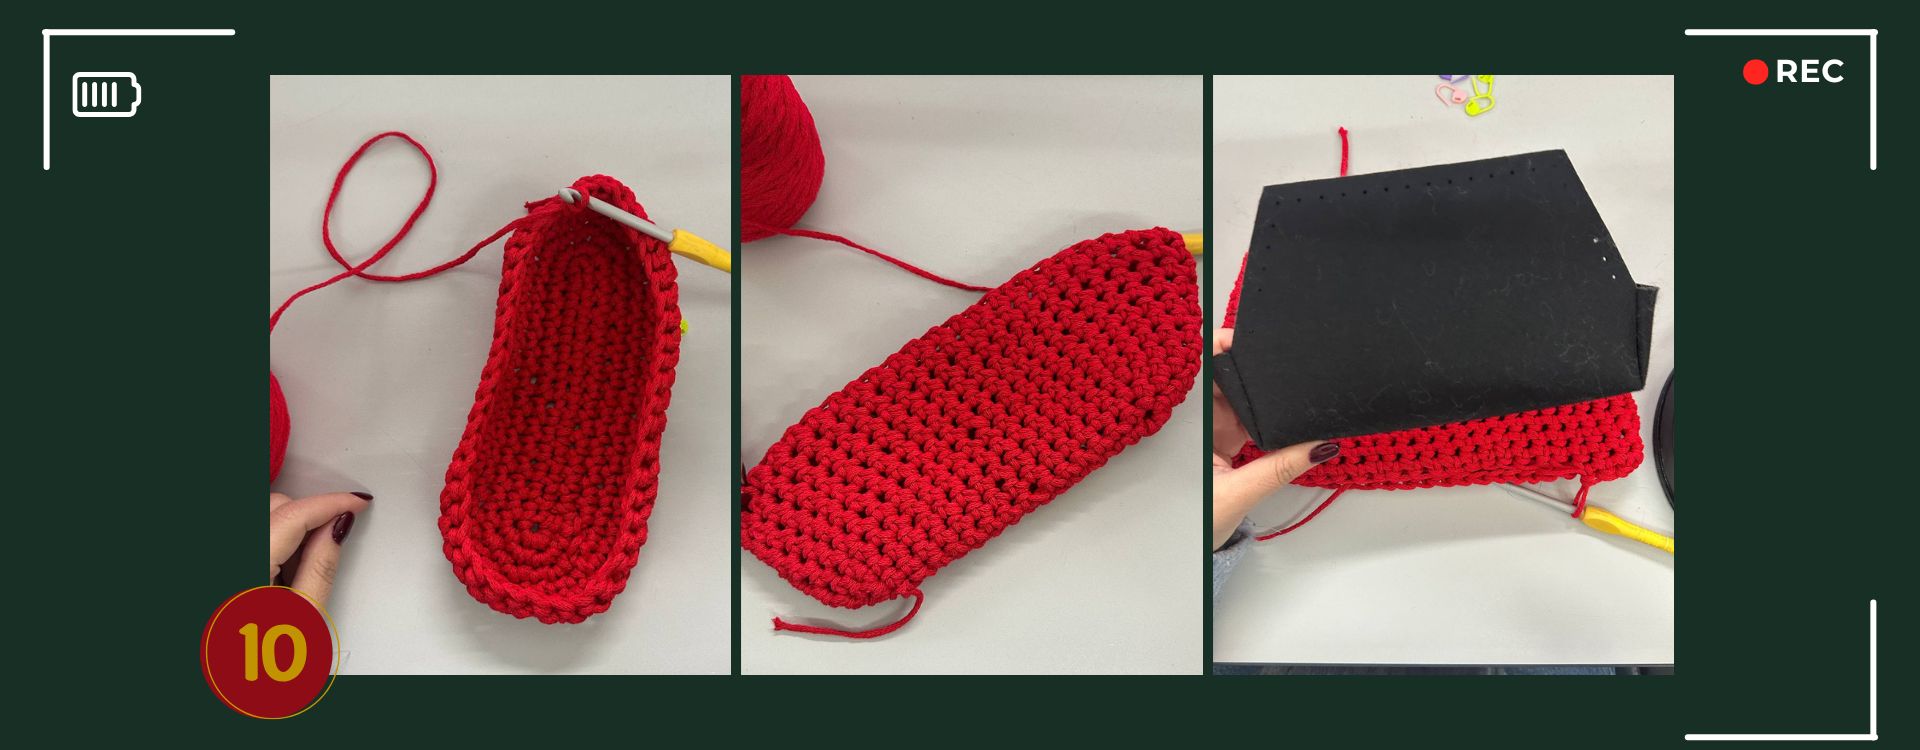
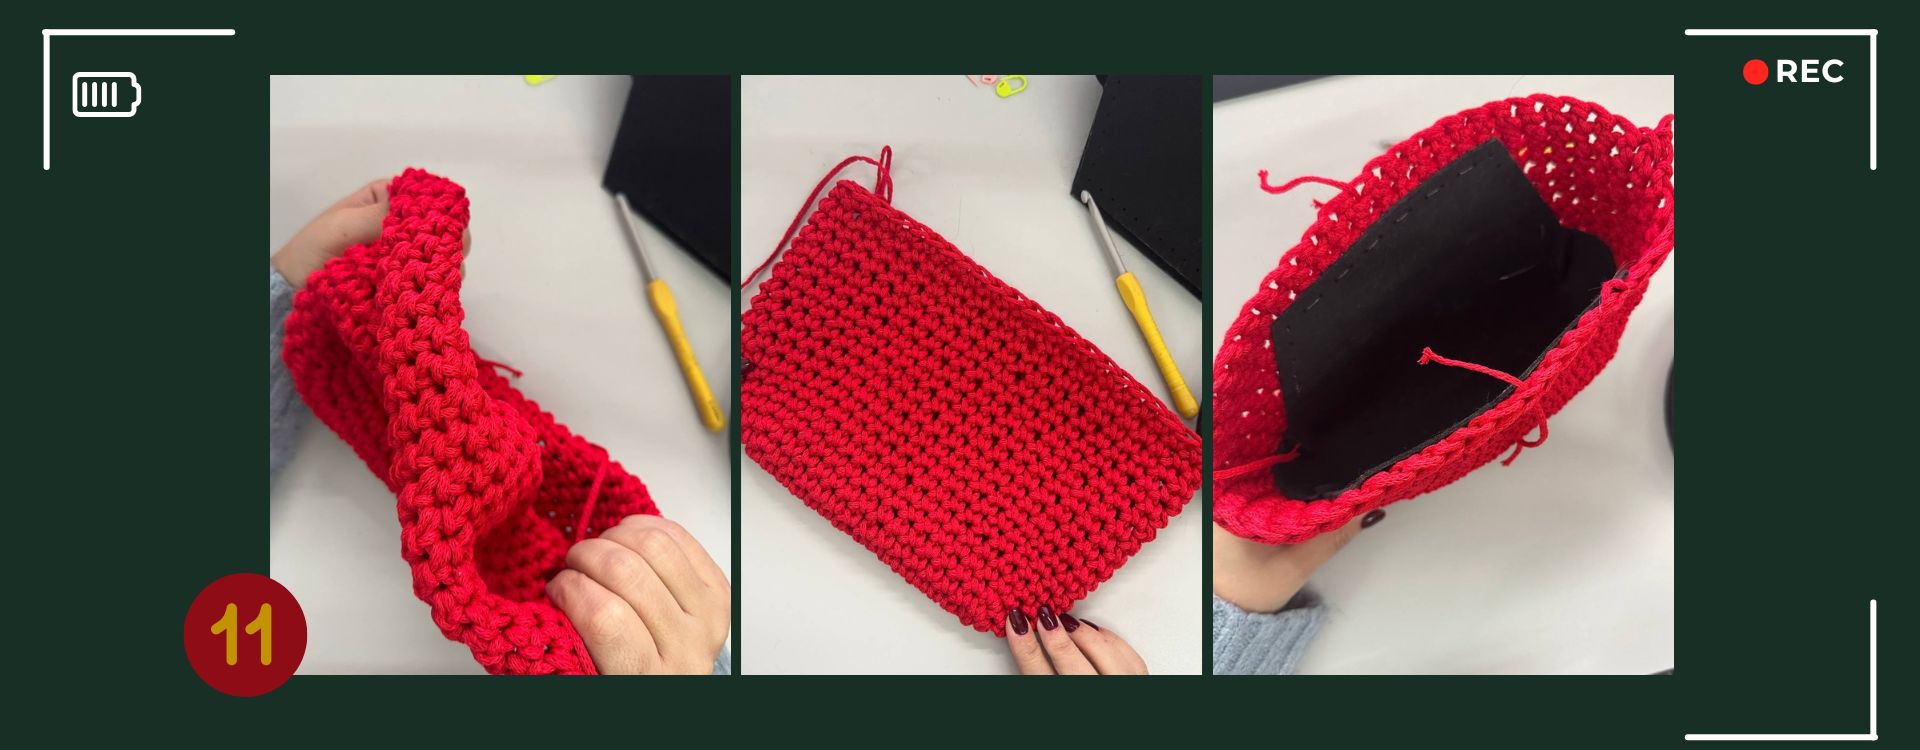
Once the desired height is achieved, flip the piece and flatten it, finding the perfect middle. Insert a piece of yarn on the right and left to mark the sides. Repeat for the width, adding two more pieces of cord on each side. Then, attach the closure, ensuring the marks align with the front center and the screws.
Closure.
Take the cord, insert the crochet hook, and pull up a loop to create 1 single crochet. Now the crochet hook will face one side, and the cord will wrap around the closure’s structure. Pull the yarn and secure with 1 single crochet along the top of the closure.
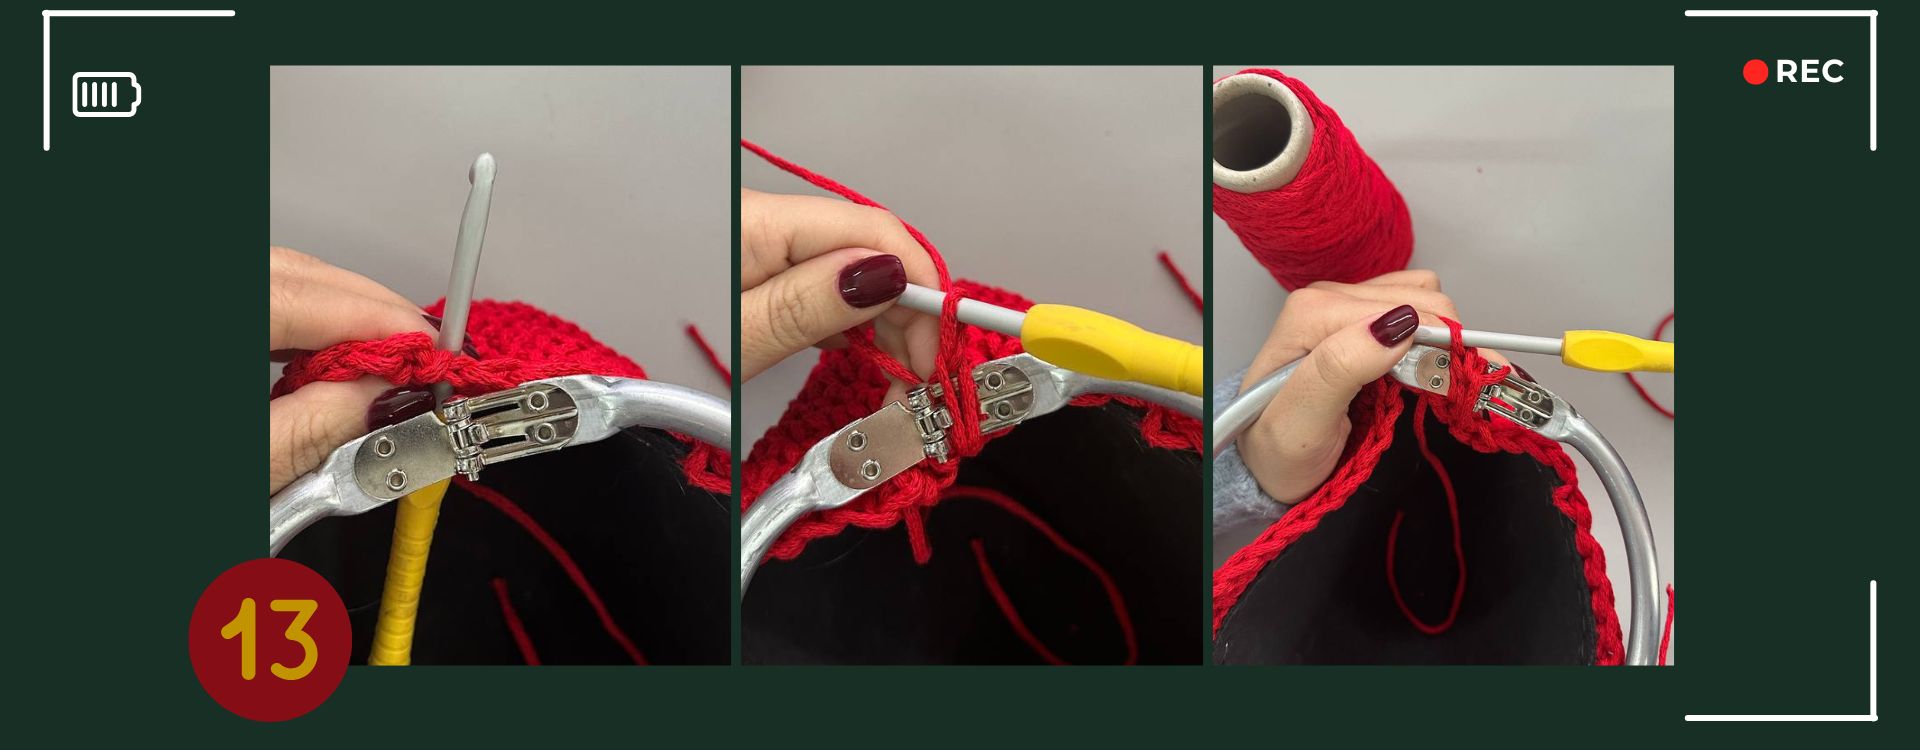
I prefer not to make the work too thick, so I work only 1 stitch on the areas near the screws of the closure, while for the front areas, I work 2 single crochets in each stitch.
Pull the yarn and hide it between the stitches.
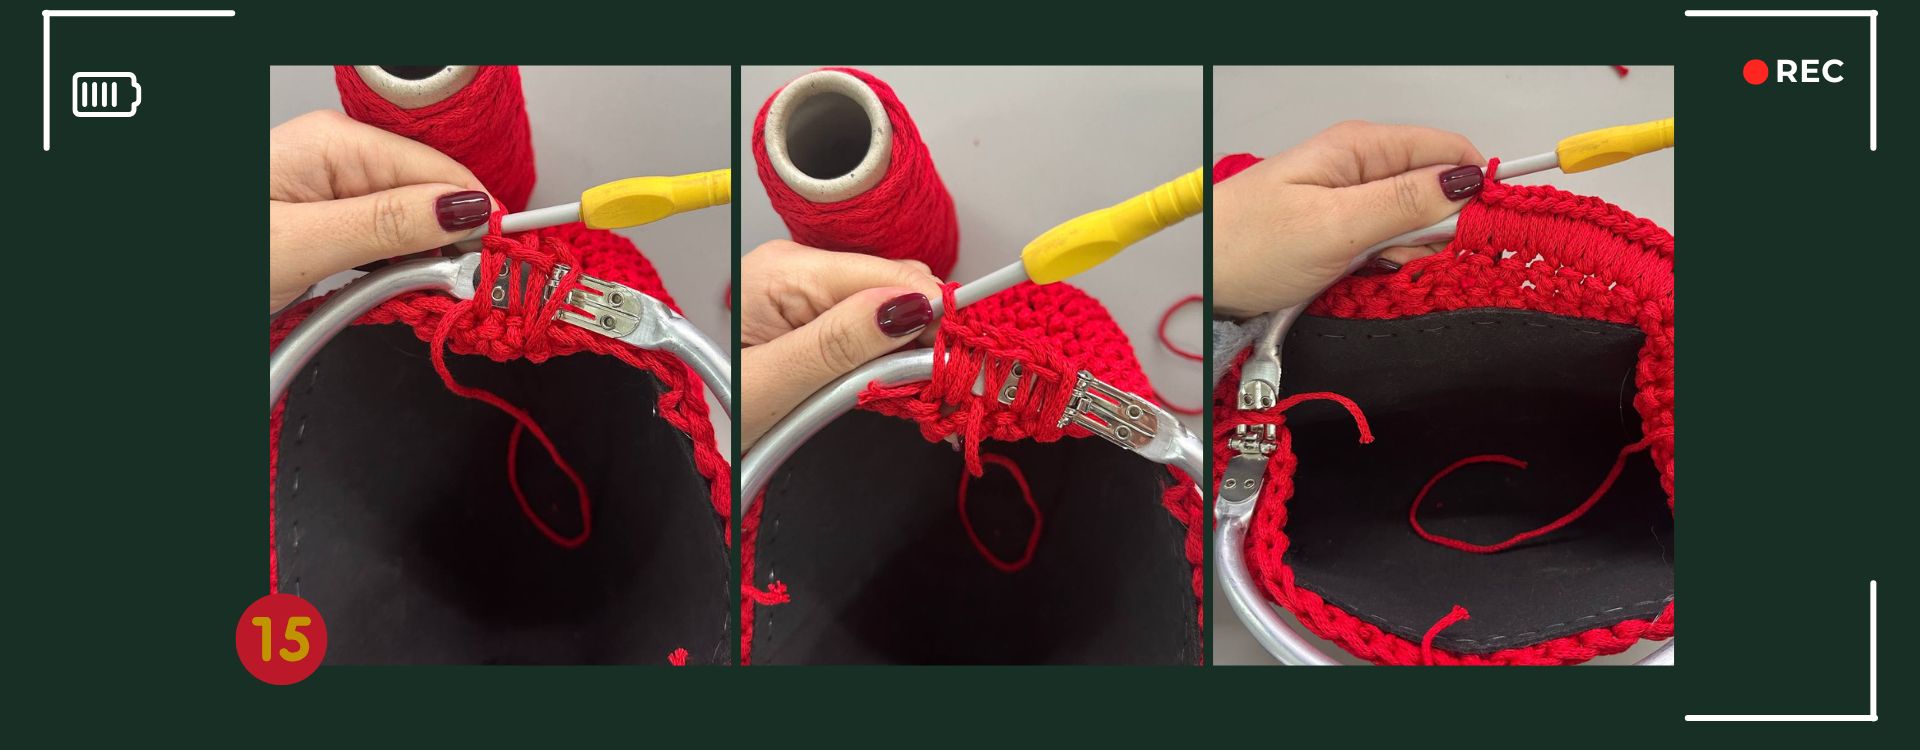
If the bag appears misshapen after closing, be patient, undo the round attaching the structure to the closure, and adjust the halves to align the length and width perfectly. On my first clutches, I had to redo it up to four times to be satisfied.
You can leave the clutch plain or decorate it with details and embellishments. Amelia made these bows—here’s the link: discover it here. I simply wrapped some Grace yarn around the center, a lovely tip I got from an expert. ;-)
.jpg)
And that’s the end of this project! I hope this guide has inspired you to create a unique and personalized clutch bag, perfect as a gift or as an accessory for yourself. Remember, every detail makes a difference: a small bow, a touch of gold, or a simple flower can add that special touch and make your work truly unique.
Don’t forget to have fun while crafting—creativity is also a moment of relaxation and joy! If you make this clutch, tag me in your projects on social media or share them with our community. I can’t wait to see your creations! Now, grab your crochet hook and… happy crafting!
Rosaria Tessiland®
.jpg)
